> For the complete documentation index, see [llms.txt](https://emcsoft.gitbook.io/ticket24/llms.txt). Markdown versions of documentation pages are available by appending `.md` to page URLs; this page is available as [Markdown](https://emcsoft.gitbook.io/ticket24/readme.md).

# TICKET24 INSTALLATION GUIDE

## <mark style="color:red;">WHAT IS TICKET24?</mark>

***

**Ticket24** is a fully integrated ticketing system to Bitrix24 platfrom. It is the important step to building a great customer experience. It's a central hub for all your customer questions, requests, and concerns. Above all, it gives you a complete picture of each customer, so you can offer the right support.

<table data-view="cards" data-full-width="true"><thead><tr><th></th><th></th><th data-hidden data-card-cover data-type="files"></th><th data-hidden></th><th data-hidden data-card-target data-type="content-ref"></th></tr></thead><tbody><tr><td>🗐 <strong>1 700+</strong></td><td>tickets every day</td><td></td><td></td><td><a href="broken://pages/CyH2xJQs9yWJ1S8BYNav">Broken link</a></td></tr><tr><td>🏙️ <strong>3 000+</strong></td><td>trusted companies</td><td></td><td></td><td><a href="broken://pages/7aUFmnCMx9m4smGncsXL">Broken link</a></td></tr><tr><td>👤 <strong>500 000+</strong></td><td>users</td><td></td><td></td><td><a href="broken://pages/JjjojIyKxaiBPzzLwvtg">Broken link</a></td></tr></tbody></table>

## <mark style="color:red;">INSTALLATION STEPS</mark>

***

## <mark style="color:red;">I. INSTALLING THE APPLICATION FROM THE BITRIX24 MARKET</mark>

Find the **Applications** section on the left Menu on your Bitrix24 portal.&#x20;

**a)** Click on **Market** to open the market window.

<div align="left"><figure><img src="https://556081438-files.gitbook.io/~/files/v0/b/gitbook-x-prod.appspot.com/o/spaces%2FmOkavtftwpMDw0OZWK5u%2Fuploads%2FuDI4qeSD3DPeAWq6JPxB%2FSFDG.PNG?alt=media&amp;token=af942a4e-afb5-4138-8055-ecfcb9901db8" alt="" width="563"><figcaption></figcaption></figure></div>

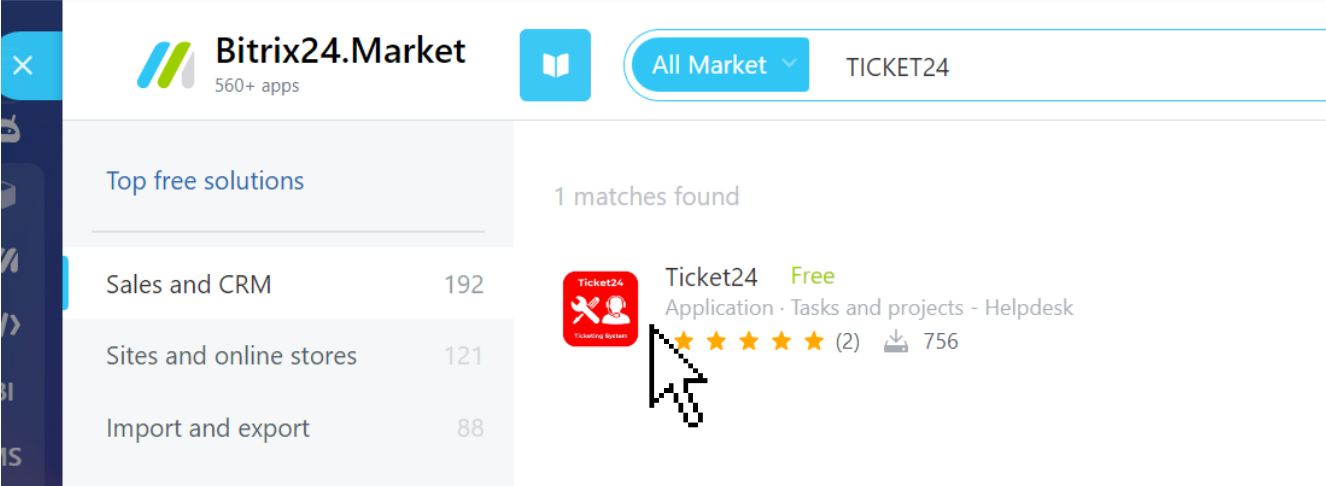
**b)** In the **Market window**, search for the **Ticket24 application** in the search bar and click on the **application**.

<figure><img src="https://556081438-files.gitbook.io/~/files/v0/b/gitbook-x-prod.appspot.com/o/spaces%2FmOkavtftwpMDw0OZWK5u%2Fuploads%2FqMGf0wAVzMgS9Stzttz4%2Fkkk.PNG?alt=media&amp;token=f9e3e544-c23c-4d4a-adc3-e1551379abbe" alt=""><figcaption></figcaption></figure>

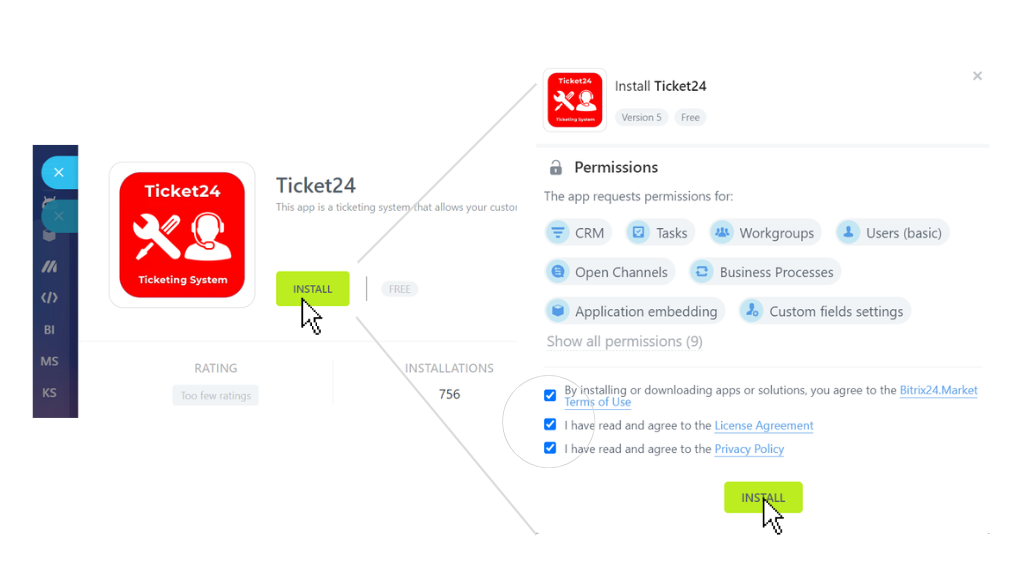
**c)** Click **install**, check all of the **boxes** in the pop up window, and click **install** again.

<figure><img src="https://556081438-files.gitbook.io/~/files/v0/b/gitbook-x-prod.appspot.com/o/spaces%2FmOkavtftwpMDw0OZWK5u%2Fuploads%2FSVGVhZMvGlOkgRuepMwY%2Fddfg.PNG?alt=media&amp;token=9621d9c2-95ec-4c84-b756-a1feb4e2b95c" alt=""><figcaption></figcaption></figure>

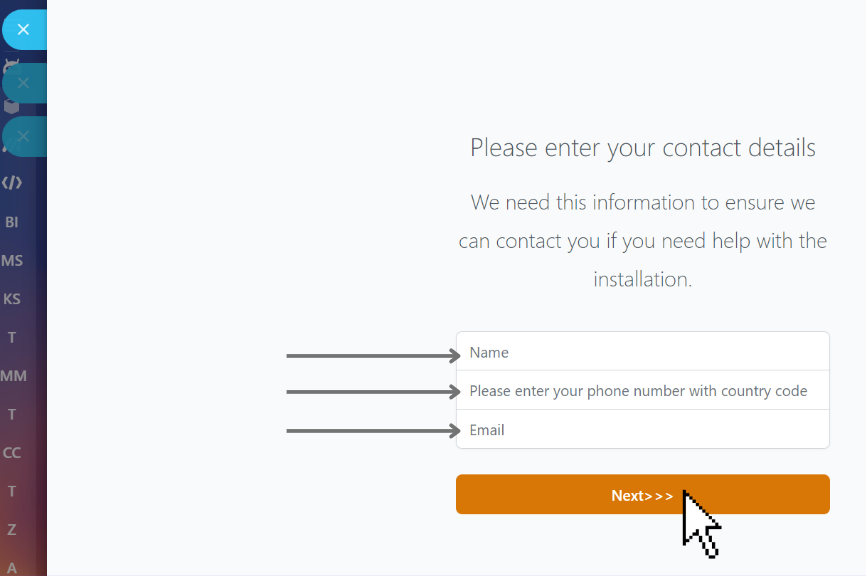
After clicking on the install button, the application will open and ask you to enter your **contact details.**

**d)** Enter your **name**, phone **number** and **email,** then click **next**.

<div align="left"><figure><img src="https://556081438-files.gitbook.io/~/files/v0/b/gitbook-x-prod.appspot.com/o/spaces%2FmOkavtftwpMDw0OZWK5u%2Fuploads%2FVEuW1z9rbMHNGY3TX6cK%2Ffdg.PNG?alt=media&amp;token=ee7359e0-8bb3-4c10-885d-7b2abfed97c6" alt="" width="563"><figcaption></figcaption></figure></div>

## <mark style="color:red;">II. APPLICATION SETTINGS</mark>

### 2.1 MAIN SETTINGS

After clicking next, you will see the **settings** window of the application. These settings include: Main settings, Group settings and Tag settings. First, let's set up the main settings.

**a)** Click on the dropdown arrow of the **Main settings** tab.

<div align="left"><figure><img src="https://556081438-files.gitbook.io/~/files/v0/b/gitbook-x-prod.appspot.com/o/spaces%2FmOkavtftwpMDw0OZWK5u%2Fuploads%2FGpKLOGyqzWmQivQuUy3t%2Fhnjgh.PNG?alt=media&amp;token=ee919bfc-fe82-4c5c-91cc-30c95a1ad8c0" alt="" width="563"><figcaption></figcaption></figure></div>

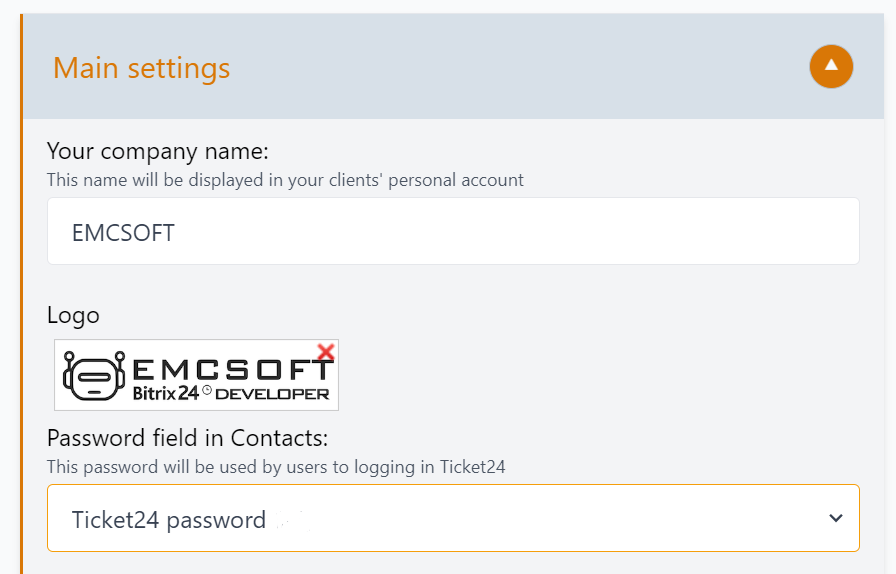
**b)** Fill in the required information: Your **company** name, **Logo** and **Password** field in contacts.\
*Note*: *logo dimensions should be 444 x 110.*

The Password field will be automatically generated as a CRM contact field and named **Ticket24 password.**

<div align="left"><figure><img src="https://556081438-files.gitbook.io/~/files/v0/b/gitbook-x-prod.appspot.com/o/spaces%2FmOkavtftwpMDw0OZWK5u%2Fuploads%2FXukRIMsD2l9PV9VHhHvK%2Fjjkhjk.PNG?alt=media&amp;token=a5689f23-0c33-4d76-8c1b-57f951d814ae" alt="" width="563"><figcaption></figcaption></figure></div>

### 2.2  USERNAME AND PASSWORD FOR CLIENTS

The **Ticket24 password** is the password your contacts will use to log in to their Ticket24 portal to view and generate tickets. The username will be the email associated with their contact card.

#### **2.2.1**- To create a **contact** for your client,&#x20;

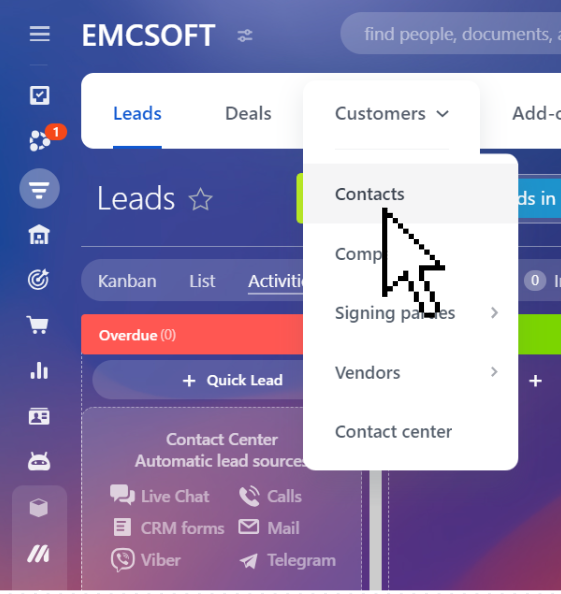
**a)** go to your **CRM** and select **Contacts** from the Customers drop down menu.

<div align="left"><figure><img src="https://556081438-files.gitbook.io/~/files/v0/b/gitbook-x-prod.appspot.com/o/spaces%2FmOkavtftwpMDw0OZWK5u%2Fuploads%2FkmeT32SLr5ATDhiWqcdi%2Fghgh.PNG?alt=media&amp;token=48b7d367-443a-4df6-ac31-a70f6afa5220" alt="" width="421"><figcaption></figcaption></figure></div>

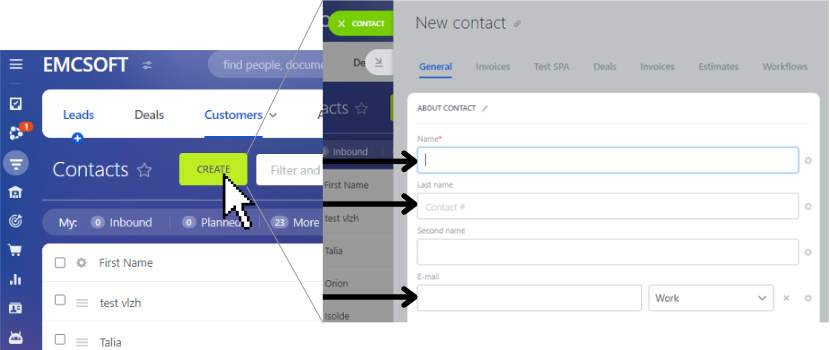
**b)** Click **Create,** enter the required fields and save.

<figure><img src="https://556081438-files.gitbook.io/~/files/v0/b/gitbook-x-prod.appspot.com/o/spaces%2FmOkavtftwpMDw0OZWK5u%2Fuploads%2F4ORzKASxllGoBd8E6h3t%2Ffdgggdfg.PNG?alt=media&amp;token=78cba941-23c5-426c-96e2-f2d95856d6a1" alt=""><figcaption></figcaption></figure>

#### **2.2.2-** To view or change the Ticket24 password for a client,

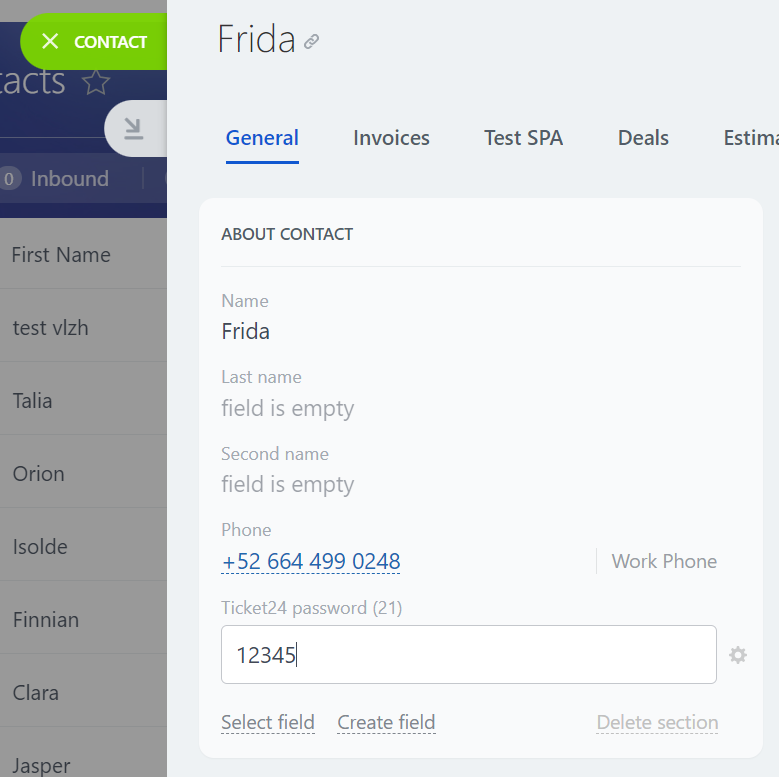
**a)** open their contact card and **Select the Ticket24 password** field.

<div align="left"><figure><img src="https://556081438-files.gitbook.io/~/files/v0/b/gitbook-x-prod.appspot.com/o/spaces%2FmOkavtftwpMDw0OZWK5u%2Fuploads%2FDB6MbxyQL7CZJID5QSzR%2Fzxczxc.PNG?alt=media&amp;token=827cd957-409c-4a55-a12f-dec228e2d55a" alt=""><figcaption></figcaption></figure></div>

**b)** Once you have selected the field, you can view and modify the password directly on the contact card:

<div align="left"><figure><img src="https://556081438-files.gitbook.io/~/files/v0/b/gitbook-x-prod.appspot.com/o/spaces%2FmOkavtftwpMDw0OZWK5u%2Fuploads%2FenNbZWu4WesQFpNivzHQ%2Fghjbn.PNG?alt=media&amp;token=a8c7e70b-f916-4da9-96fa-ca8407cde186" alt="" width="563"><figcaption></figcaption></figure></div>

#### **2.2.3-** To give client access to their Ticket24 portal,&#x20;

copy the password from their contact card and send it to them.&#x20;

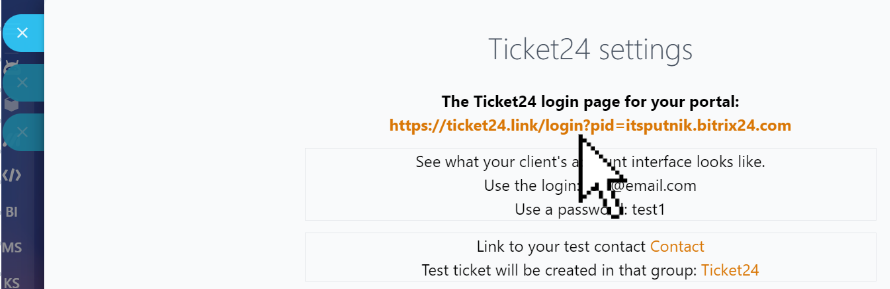
You can also **log in as the client** to see what their portal looks like.&#x20;

**a)** To do this, go to the settings page of the application and **click on the link to the Ticket24 portal**.

<figure><img src="https://556081438-files.gitbook.io/~/files/v0/b/gitbook-x-prod.appspot.com/o/spaces%2FmOkavtftwpMDw0OZWK5u%2Fuploads%2FPuTTI6Lt8cy2OiAb8Y05%2Fbnmn.PNG?alt=media&amp;token=5806f19d-ddf5-4d80-874a-b09a1f20e42a" alt=""><figcaption></figcaption></figure>

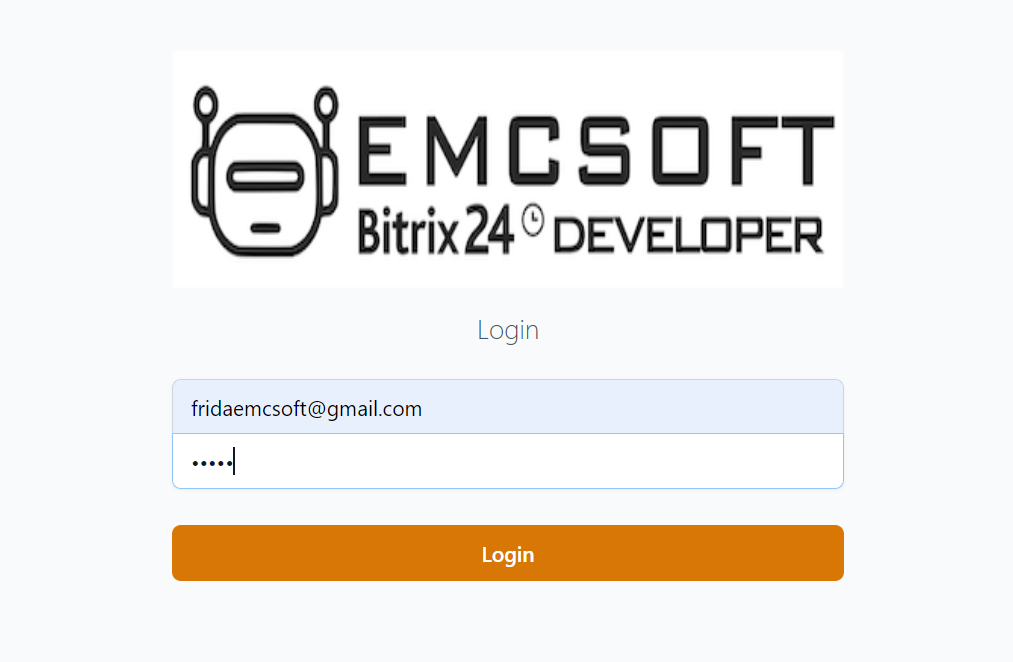
**b)** Then, copy and paste your client's **email** and **password** and click **Login**.

<div align="left"><figure><img src="https://556081438-files.gitbook.io/~/files/v0/b/gitbook-x-prod.appspot.com/o/spaces%2FmOkavtftwpMDw0OZWK5u%2Fuploads%2Fd4ZidI3A06afmv0tAJdk%2Ffhgjhj.PNG?alt=media&amp;token=d73899a6-2de5-4631-a987-e5185a802ac0" alt="" width="563"><figcaption></figcaption></figure></div>

This is what your **client's portal** will look like (keep in mind we have not created any tickets yet):

<div align="left"><figure><img src="https://556081438-files.gitbook.io/~/files/v0/b/gitbook-x-prod.appspot.com/o/spaces%2FmOkavtftwpMDw0OZWK5u%2Fuploads%2FroMU9fizsa0U2CyiTOqW%2Fvcb%20vn.PNG?alt=media&amp;token=148922db-9a1b-4391-ab57-2fbf3940400b" alt=""><figcaption></figcaption></figure></div>

### 2.3 CHANGE THE NAME OF THE PASSWORD FIELD

#### It is possible to change the name of the field used for storing the clients' passwords.&#x20;

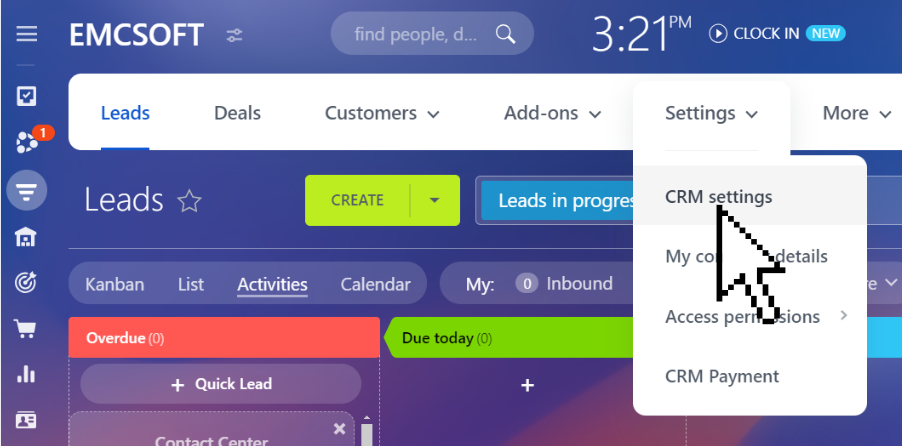
**a)** To do this go to your **CRM Settings** in the CRM section of your Bitrix Portal.

<div align="left"><figure><img src="https://556081438-files.gitbook.io/~/files/v0/b/gitbook-x-prod.appspot.com/o/spaces%2FmOkavtftwpMDw0OZWK5u%2Fuploads%2FuiMYoNoQZh5eSuWCBgSZ%2Fhhhhh.PNG?alt=media&amp;token=c6778332-b20d-4af3-a86c-76e89e06ac33" alt="" width="563"><figcaption></figcaption></figure></div>

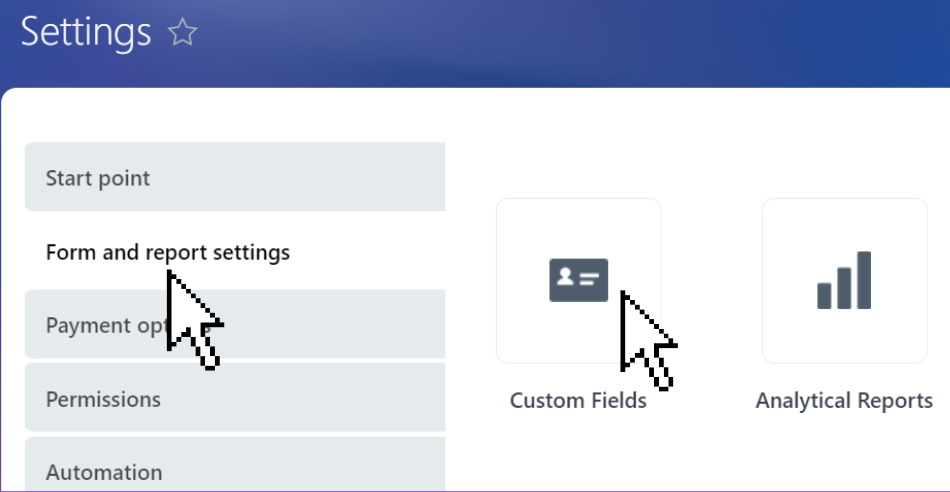
**b)** Select the **Form and report settings** tab, and then click on **custom fields**.

<div align="left"><figure><img src="https://556081438-files.gitbook.io/~/files/v0/b/gitbook-x-prod.appspot.com/o/spaces%2FmOkavtftwpMDw0OZWK5u%2Fuploads%2FvtC50pzP7fS838t8LH6Y%2Fvc%20bcvb.PNG?alt=media&amp;token=b335141a-e982-40ba-b377-07891abc5e19" alt="" width="563"><figcaption></figcaption></figure></div>

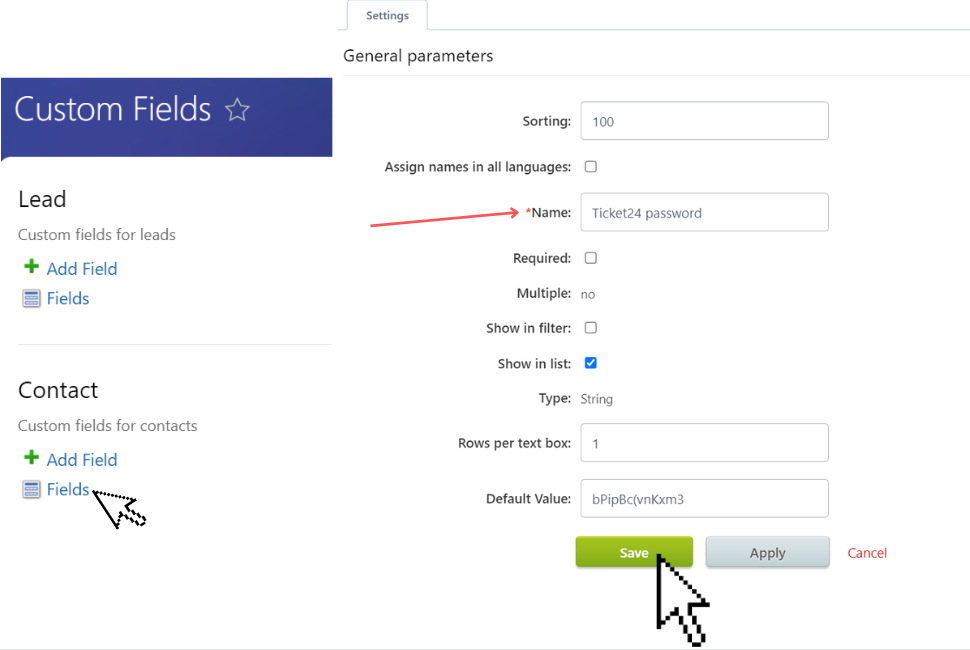
**c)** Open the **Fields** section for the **Contacts** and look for the **Ticket24 password field** from the fields list.&#x20;

Once you open it, edit the **Name** and click **save**.

<figure><img src="https://556081438-files.gitbook.io/~/files/v0/b/gitbook-x-prod.appspot.com/o/spaces%2FmOkavtftwpMDw0OZWK5u%2Fuploads%2FYMM8d8tCmTGdGrTbdipb%2Ffghjj.PNG?alt=media&amp;token=4933d0e4-8e4c-4eb6-b2b8-9fade40805c8" alt=""><figcaption></figcaption></figure>

### 2.4 GROUP SETTINGS

The next step is setting up the **Group Settings.**&#x20;

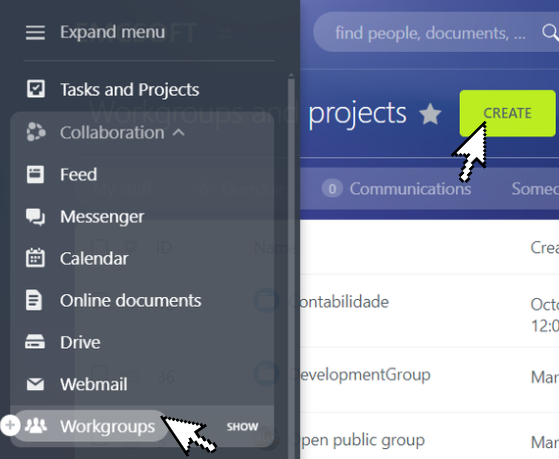
**a)** Create a W**orkgroup** in your Bitrix24 portal.

Go to Workgroups and click **Create**.

<div align="left"><figure><img src="https://556081438-files.gitbook.io/~/files/v0/b/gitbook-x-prod.appspot.com/o/spaces%2FmOkavtftwpMDw0OZWK5u%2Fuploads%2Fg4fDgkLoaepIvHV4exVR%2Faa.PNG?alt=media&amp;token=c40fdce4-350c-4d7a-b61d-27bb342c35e1" alt="" width="419"><figcaption></figcaption></figure></div>

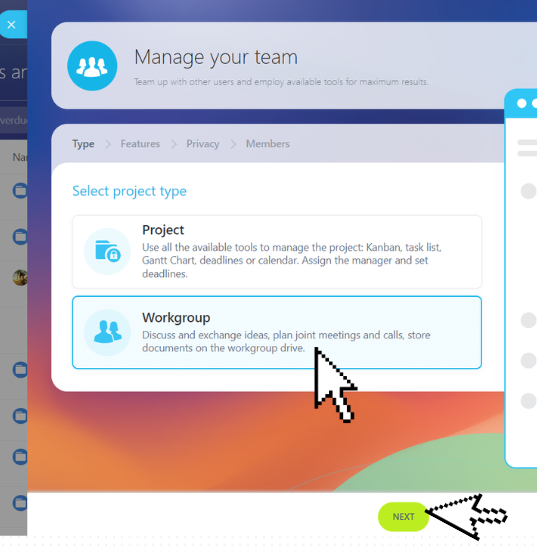
**b)** Select project type as **Workgroup** and click **next.**

<div align="left"><figure><img src="https://556081438-files.gitbook.io/~/files/v0/b/gitbook-x-prod.appspot.com/o/spaces%2FmOkavtftwpMDw0OZWK5u%2Fuploads%2F0ExS67tgNDmAf7JaMFeO%2Faaa.PNG?alt=media&amp;token=2fba1295-f246-4773-8057-774c8ba7759b" alt="" width="403"><figcaption></figcaption></figure></div>

**c)** Write a name for your workgroup, you can also customize the theme, choose an icon and write a description.

<div align="left"><figure><img src="https://556081438-files.gitbook.io/~/files/v0/b/gitbook-x-prod.appspot.com/o/spaces%2FmOkavtftwpMDw0OZWK5u%2Fuploads%2FlF3ARIfoRlVAUP8pQ2IX%2Faaaa.PNG?alt=media&amp;token=c094fc3e-9f0b-43f9-bd70-a6b1281a8b61" alt="" width="563"><figcaption></figcaption></figure></div>

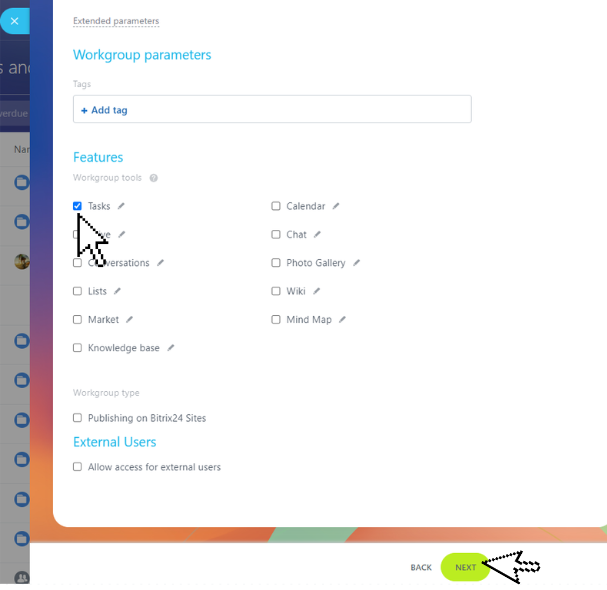
**d)** Open the **Extended parameters,** make sure to check the **Tasks** box and click **next**.&#x20;

You can also check other boxes depending on the features you'd like in your **Workgroup.**

<div align="left"><figure><img src="https://556081438-files.gitbook.io/~/files/v0/b/gitbook-x-prod.appspot.com/o/spaces%2FmOkavtftwpMDw0OZWK5u%2Fuploads%2FID6zJJfXvbjg5u1SnD7s%2Fb.PNG?alt=media&amp;token=ca88e328-0a04-48ff-aaf6-46cc33b5a24e" alt=""><figcaption></figcaption></figure></div>

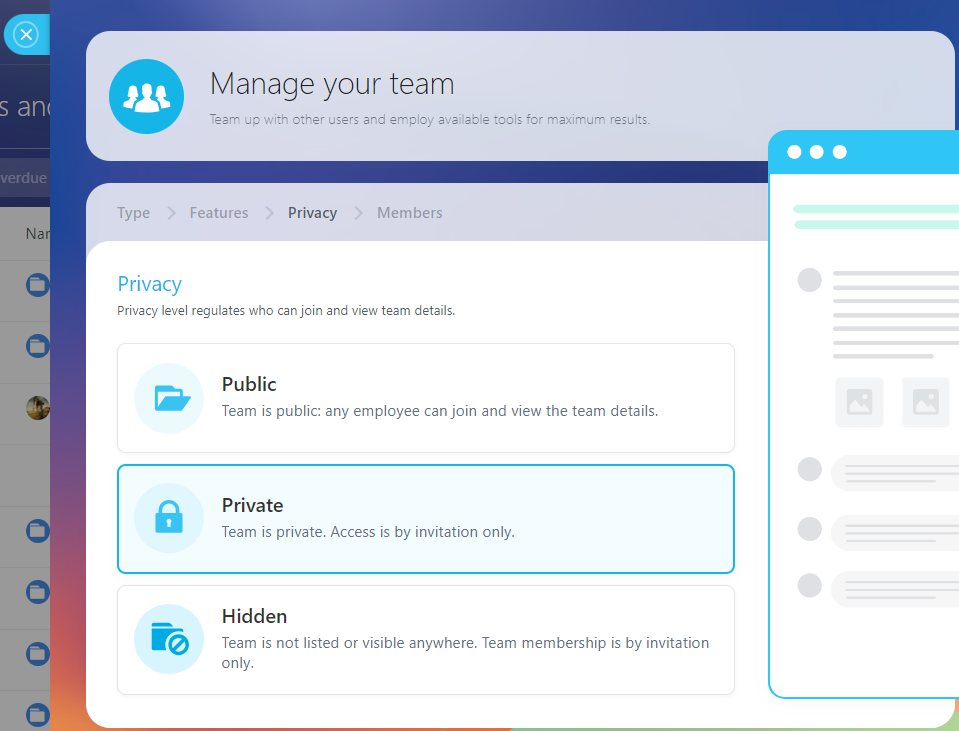
**e)** Choose the **Privacy level** as **private** and click nex&#x74;**.**

<figure><img src="https://556081438-files.gitbook.io/~/files/v0/b/gitbook-x-prod.appspot.com/o/spaces%2FmOkavtftwpMDw0OZWK5u%2Fuploads%2FQJyBKUWTeI5vMx6teKAm%2Fbb.PNG?alt=media&amp;token=b33eb1f2-681a-43ce-90c0-06b0d43bc29d" alt=""><figcaption></figcaption></figure>

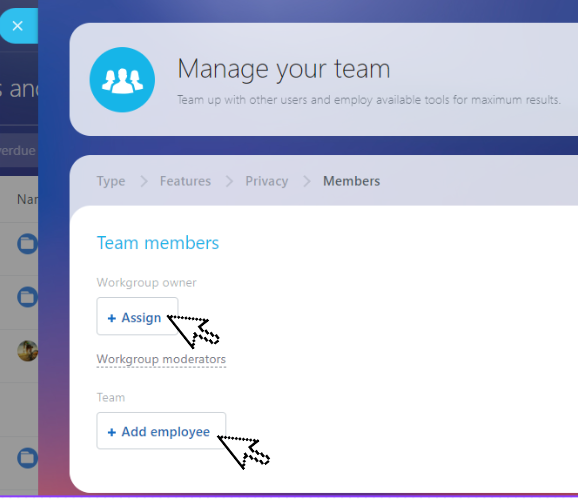
&#x20;**f)** Assign a Workgroup owner and add employees to your **workgroup team.**

<mark style="color:orange;">**Important note!**</mark> When you add employees to the group, they will be the ones, who can see the tickets in your workgroup.

<div align="left"><figure><img src="https://556081438-files.gitbook.io/~/files/v0/b/gitbook-x-prod.appspot.com/o/spaces%2FmOkavtftwpMDw0OZWK5u%2Fuploads%2FXciaK2EkVwQmR7qe7YkV%2Fbbb.PNG?alt=media&amp;token=6f8fc2df-d71a-49d5-b0ff-a188169338b9" alt="" width="434"><figcaption></figcaption></figure></div>

**g)** Go back to the Ticket24 settings.

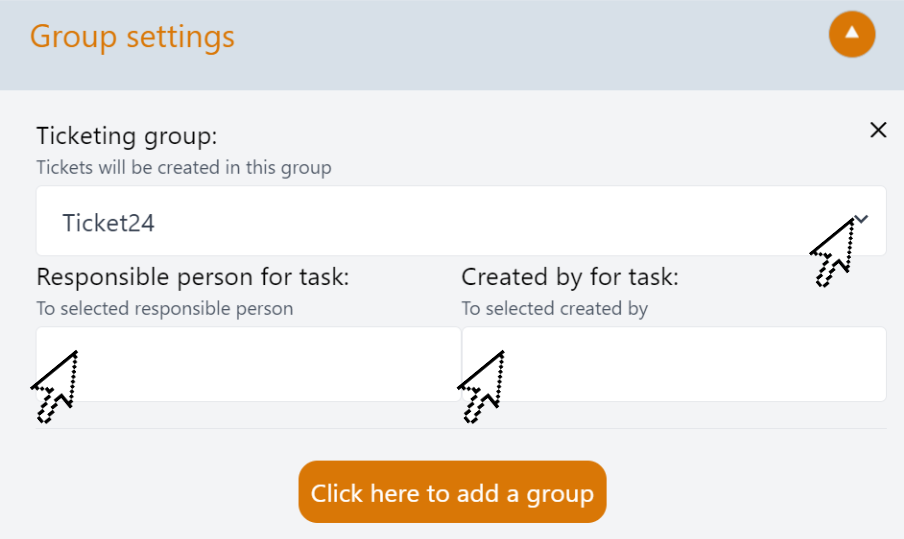
Click on the **Group settings** downwards arrow.

<div align="left"><figure><img src="https://556081438-files.gitbook.io/~/files/v0/b/gitbook-x-prod.appspot.com/o/spaces%2FmOkavtftwpMDw0OZWK5u%2Fuploads%2FfUCCLRcY8529tgKLxL8F%2Fa.PNG?alt=media&amp;token=3f4ac5fe-0f2c-46b4-8456-312f9ea8f6a5" alt="" width="563"><figcaption></figcaption></figure></div>

**h)** Select the **Workgroup** where the tasks from the Tickets will be created and select a the person who will be **responsible** for them, as well as a **creator** for the tasks.

To add another Workgroup, click on the orange button at the bottom.

<div align="left"><figure><img src="https://556081438-files.gitbook.io/~/files/v0/b/gitbook-x-prod.appspot.com/o/spaces%2FmOkavtftwpMDw0OZWK5u%2Fuploads%2FPMvcOsDnCF2uFQaTaHww%2Fbvbcvbcvb.PNG?alt=media&amp;token=48804eb6-6f9b-4f57-b44a-bab30478f334" alt="" width="563"><figcaption></figcaption></figure></div>

### 2.5 TAG SETTINGS

Enter tags for **ticket processing rules**. These tags should be created to fit your company's needs. They can be changed anytime.

When creating tags in each section: **enter** the **text** and press **Enter** after each tag.

It is **not necessary to enter all tags**. If you don't enter tags, they simply won't be available when creating a ticket.

Setting up **tags** is necessary for the operation of **Robots** in tasks in Bitrix24. But you can use robots only in the **Professional tariff plan**, since robots are not available in smaller tariff plans.

<div align="left"><figure><img src="https://556081438-files.gitbook.io/~/files/v0/b/gitbook-x-prod.appspot.com/o/spaces%2FmOkavtftwpMDw0OZWK5u%2Fuploads%2FabuNs5ncG5skqWqVIDfP%2Fbbbb.png?alt=media&amp;token=ef4a2090-0076-4d07-be3d-7db506d59163" alt="" width="563"><figcaption></figcaption></figure></div>

**a)** Section **Type of message:**

In the example shown above, the tags **bugs** and **development** are assigned. These tags determine the responsible person who will handle the ticket.

**b)** Section **Priority:**

In this example, the tags **high**, **low** and **medium** are assigned. These tags assign different deadlines for ticket completion.

**c)** Section **Sector:**

In this example, the tags **USA** and **Europe** are assigned. The sector may refer to the region. For example, if the activity is in the USA, Europe, etc., the client selects USA in the ticket if they are from the USA.

<mark style="color:orange;">**Important note!**</mark> After setting all the configurations, remember to **save all changes.**

### **2.6 TAG SETTINGS AND ROBOTS**

Write automation rules depending on the message type selected by the client using the tags using robots.

**a)** Open the **workgroup** you created for Ticket24 and click on the **robot** icon.

<figure><img src="https://556081438-files.gitbook.io/~/files/v0/b/gitbook-x-prod.appspot.com/o/spaces%2FmOkavtftwpMDw0OZWK5u%2Fuploads%2FUSiqw9owC0YSbjS1I9P1%2Fc.PNG?alt=media&amp;token=4c50eef5-a77b-40e5-bb9a-2aa6cb152e2b" alt=""><figcaption></figcaption></figure>

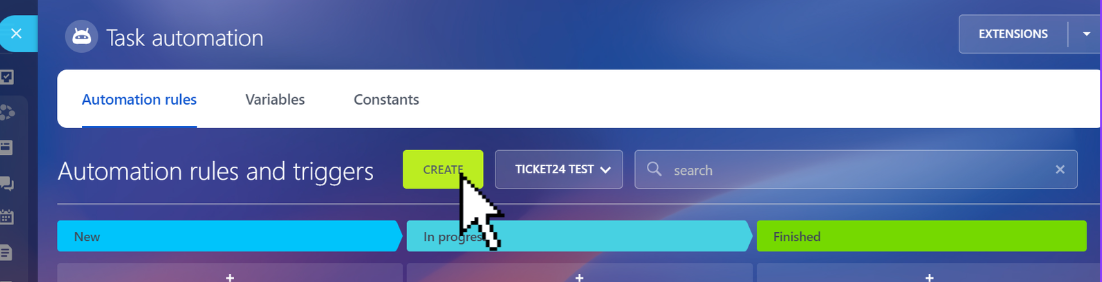
**b)** The Task automation window will open, click **Create**.

<figure><img src="https://556081438-files.gitbook.io/~/files/v0/b/gitbook-x-prod.appspot.com/o/spaces%2FmOkavtftwpMDw0OZWK5u%2Fuploads%2FnHdWdJfNipcnKH5Jq1Uj%2Fcc.PNG?alt=media&amp;token=cec053a8-d340-490b-bc53-f732c36de4b9" alt=""><figcaption></figcaption></figure>

#### **2.6.1-** Robots for **Type of message** section: **bugs tag**.

**a)** Select the **New** stage.

<div align="left"><figure><img src="https://556081438-files.gitbook.io/~/files/v0/b/gitbook-x-prod.appspot.com/o/spaces%2FmOkavtftwpMDw0OZWK5u%2Fuploads%2FrJqpwLaqgcxikL3Oyxso%2Fccc.png?alt=media&amp;token=04c475c8-6329-404d-9bbe-377a7699ae28" alt="" width="514"><figcaption></figcaption></figure></div>

**b)** Choose the group **For employee**, and **add** the **Change assignee** robot.

<div align="left"><figure><img src="https://556081438-files.gitbook.io/~/files/v0/b/gitbook-x-prod.appspot.com/o/spaces%2FmOkavtftwpMDw0OZWK5u%2Fuploads%2FD3RCim0hpGsCjPpVhOeH%2Feeee.png?alt=media&amp;token=956a29a9-0610-4857-84ac-522737d8d703" alt="" width="563"><figcaption></figcaption></figure></div>

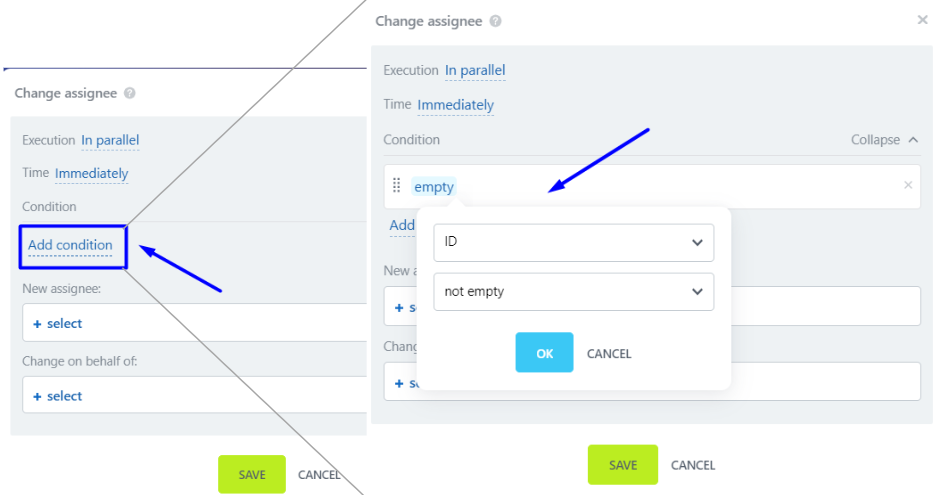
**c)** Click the **Add condition** button in the Condition section and then click on an **empty line with a condition.**

When clicking this line, you will see a small white menu with 2 fields that have a dropdown list.

<figure><img src="https://556081438-files.gitbook.io/~/files/v0/b/gitbook-x-prod.appspot.com/o/spaces%2FmOkavtftwpMDw0OZWK5u%2Fuploads%2FEZkuJeI0gMfsJEfBI9I7%2Fcccc.PNG?alt=media&amp;token=0258015a-4ce3-4ef1-abbd-74c9ee7e1740" alt=""><figcaption></figcaption></figure>

**d)** Click on the dropdown list with the value **ID**, search through the search bar for **Tags** and click on it.

<div align="left"><figure><img src="https://556081438-files.gitbook.io/~/files/v0/b/gitbook-x-prod.appspot.com/o/spaces%2FmOkavtftwpMDw0OZWK5u%2Fuploads%2FxELm9z84MYalvFaXVLtW%2Fd.png?alt=media&amp;token=f5f3cee9-06bd-4117-a20f-d353e48ab10b" alt="" width="548"><figcaption></figcaption></figure></div>

**e)** Click on the dropdown list with the value **not empty** and select the value **includes**.

<div align="left"><figure><img src="https://556081438-files.gitbook.io/~/files/v0/b/gitbook-x-prod.appspot.com/o/spaces%2FmOkavtftwpMDw0OZWK5u%2Fuploads%2FupIr1iI2D60X7jJZUyKE%2Fdd.png?alt=media&amp;token=4b8ed547-a110-43d2-9aff-9d6ee5ecc93a" alt="" width="491"><figcaption></figcaption></figure></div>

**f)** Enter the value **bugs** in the field and click the **OK** button.

<div align="left"><figure><img src="https://556081438-files.gitbook.io/~/files/v0/b/gitbook-x-prod.appspot.com/o/spaces%2FmOkavtftwpMDw0OZWK5u%2Fuploads%2FfxUzS7GtOGw58VUcuTLR%2Fddd.png?alt=media&amp;token=ac4d34bb-f870-4323-ac83-e5ec2d86bd7b" alt="" width="489"><figcaption></figcaption></figure></div>

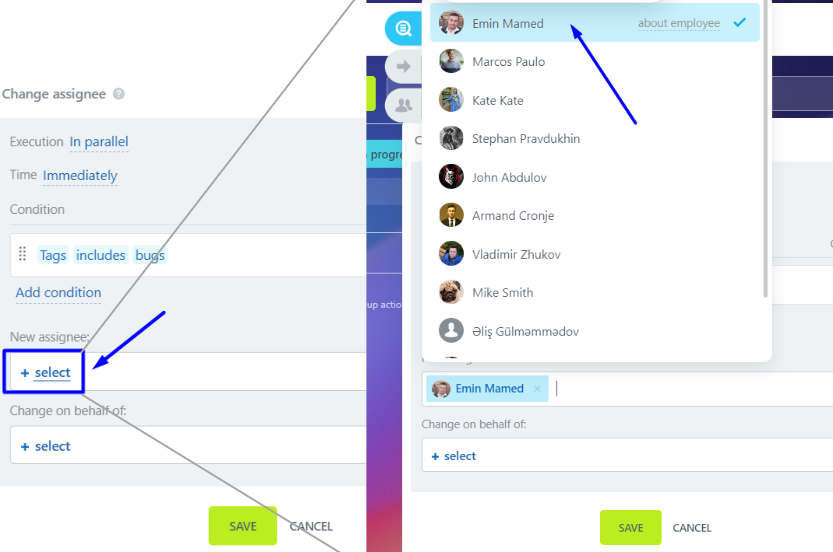
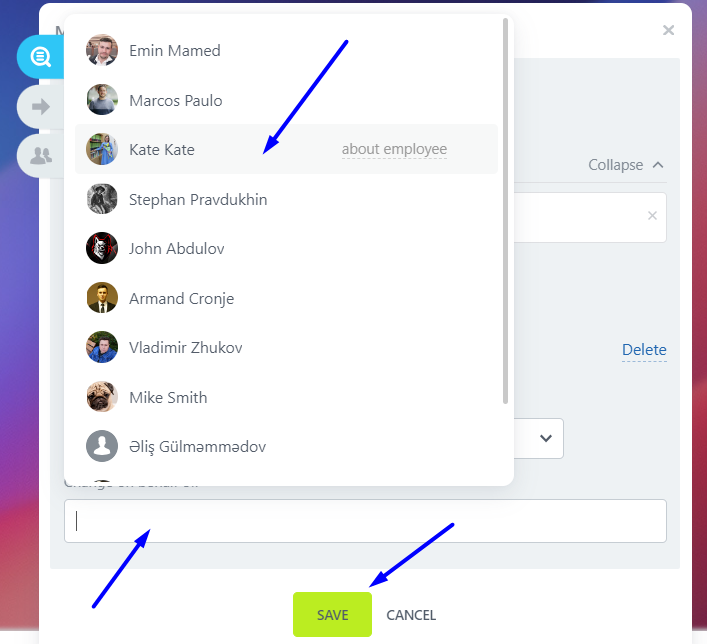
**g)** Click the **Select** button in the **New assignee** section and select the assignee from the list of employees.

<figure><img src="https://556081438-files.gitbook.io/~/files/v0/b/gitbook-x-prod.appspot.com/o/spaces%2FmOkavtftwpMDw0OZWK5u%2Fuploads%2FSXDgx8bgM6INNSHUyO3Y%2Fdddd.PNG?alt=media&amp;token=4536d285-c54e-47f0-bf6d-d448b455741f" alt=""><figcaption></figcaption></figure>

**h)** The **bugs tag** robot setup should look like this:

<div align="left"><figure><img src="https://556081438-files.gitbook.io/~/files/v0/b/gitbook-x-prod.appspot.com/o/spaces%2FmOkavtftwpMDw0OZWK5u%2Fuploads%2FZLCpF9ou1WjY2FekfONq%2Fe.png?alt=media&amp;token=a10ab1a9-1dde-4e4a-9a93-113d84207ae0" alt="" width="485"><figcaption></figcaption></figure></div>

Make sure to click **Save.**

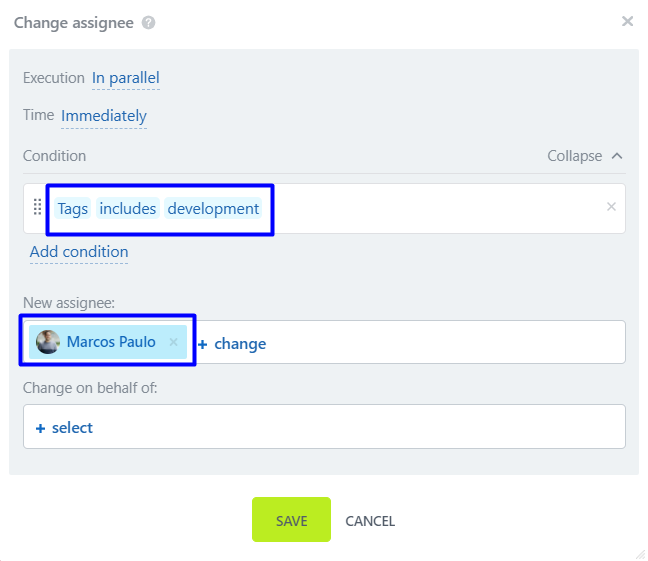
#### **2.6.2-** Robots for **Type of message** section: **development tag.**

**a)** Repeat the steps in the previous section ([**2.6.1-** Robots for **Type of message** section: **bugs tag**](#id-2.6.1-robots-for-type-of-message-section-bugs-tag)**),** before savin&#x67;**,** make sure your robot looks like this:

<div align="left"><figure><img src="https://556081438-files.gitbook.io/~/files/v0/b/gitbook-x-prod.appspot.com/o/spaces%2FmOkavtftwpMDw0OZWK5u%2Fuploads%2FfLivkDOEY3i09bGn8lgQ%2Fee.png?alt=media&amp;token=c58d6c09-f62c-4c49-becb-604fb04f854d" alt="" width="486"><figcaption></figcaption></figure></div>

Now that you have **setup the robot**, when a ticket is received from the client, the **responsible person** for handling the ticket is **automatically assigned** to the users you chose:

<div align="left"><figure><img src="https://556081438-files.gitbook.io/~/files/v0/b/gitbook-x-prod.appspot.com/o/spaces%2FmOkavtftwpMDw0OZWK5u%2Fuploads%2F69UOn0ONqU1A64AVFl71%2Feee.png?alt=media&amp;token=fc26ac8d-7369-4f3e-9cdf-1089651649de" alt="" width="563"><figcaption></figcaption></figure></div>

#### **2.6.3-** Robots for **Priority** section: **High tag**

**a)** Follow steps **a** and **b** of the [**2.6 TAG SETTINGS AND ROBOTS**](#id-2.6-tag-settings-and-robots) section viewed above.

**b)** Select the **New** stage.

<div align="left"><figure><img src="https://556081438-files.gitbook.io/~/files/v0/b/gitbook-x-prod.appspot.com/o/spaces%2FmOkavtftwpMDw0OZWK5u%2Fuploads%2F1iMLSg0BJur6oKjZhD6c%2Fff.png?alt=media&amp;token=960d6400-2aa4-461e-8e47-e0b7e5aa1f2d" alt="" width="514"><figcaption></figcaption></figure></div>

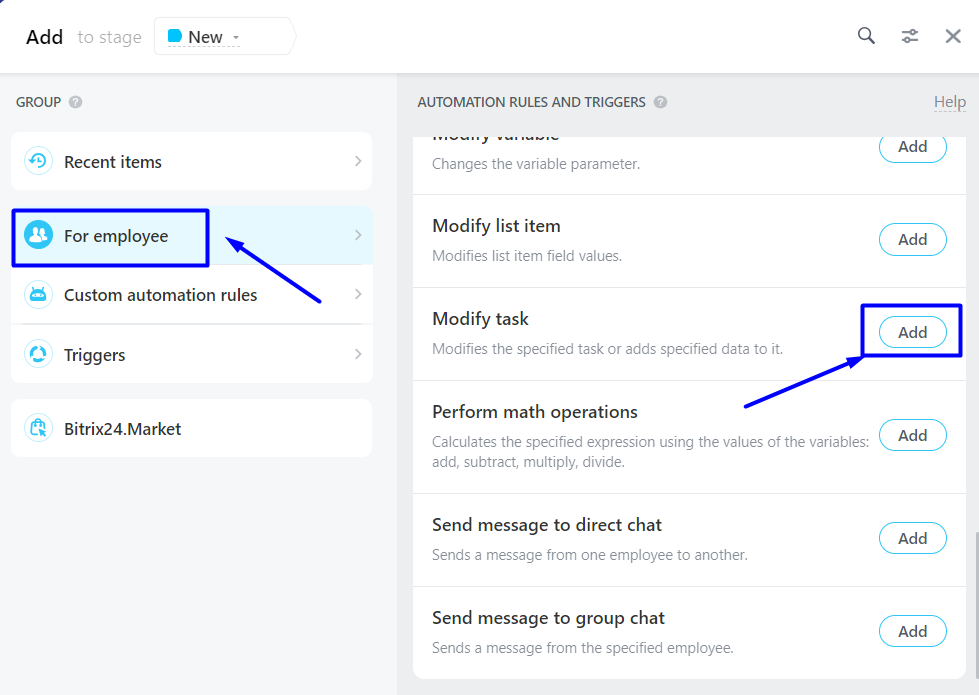
**c)** Choose the group **For employee**, and **add** the **Modify task** robot.

<div align="left"><figure><img src="https://556081438-files.gitbook.io/~/files/v0/b/gitbook-x-prod.appspot.com/o/spaces%2FmOkavtftwpMDw0OZWK5u%2Fuploads%2FeO5kxcQcxy1b5f1UsEG6%2Ffff.png?alt=media&amp;token=52e086e4-8c19-4213-ac7a-58267cd6eb2c" alt="" width="563"><figcaption></figcaption></figure></div>

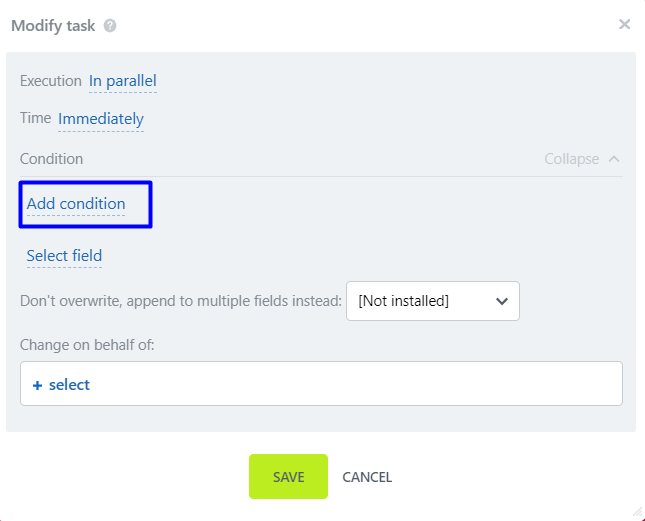
**d) Delete** the field with the **name**.

<div align="left"><figure><img src="https://556081438-files.gitbook.io/~/files/v0/b/gitbook-x-prod.appspot.com/o/spaces%2FmOkavtftwpMDw0OZWK5u%2Fuploads%2F1ay6O6lNkmrCdIcR92fv%2Fffff.png?alt=media&amp;token=631a2784-4f4a-4d98-99cf-e26e534fc1a3" alt="" width="482"><figcaption></figcaption></figure></div>

**e)** Click the **Add condition** button in the **Condition** section.

<div align="left"><figure><img src="https://556081438-files.gitbook.io/~/files/v0/b/gitbook-x-prod.appspot.com/o/spaces%2FmOkavtftwpMDw0OZWK5u%2Fuploads%2FMo1YRY9GJa3CEv9bu6IL%2Fg.png?alt=media&amp;token=3273d65f-b03f-44e8-a1ce-80d7855295d0" alt="" width="484"><figcaption></figcaption></figure></div>

**f)** Click on an **empty line** with a condition, then on the dropdown list with the value **ID**, search through the search bar for **Tags**, and click on it.

<div align="left"><figure><img src="https://556081438-files.gitbook.io/~/files/v0/b/gitbook-x-prod.appspot.com/o/spaces%2FmOkavtftwpMDw0OZWK5u%2Fuploads%2FniIcCsIYwsDDpMh1T2gb%2Fgg.png?alt=media&amp;token=f07de1bf-782d-4299-8583-d1e473c14564" alt="" width="487"><figcaption></figcaption></figure></div>

**g)** Click on the dropdown list with the value **not empty** and select the value **includes**.

<div align="left"><figure><img src="https://556081438-files.gitbook.io/~/files/v0/b/gitbook-x-prod.appspot.com/o/spaces%2FmOkavtftwpMDw0OZWK5u%2Fuploads%2F4Ko5oN7DtS8veBWKkTjr%2Fggg.png?alt=media&amp;token=e3ff13dd-d5cc-43fc-b279-5f209cd99832" alt="" width="497"><figcaption></figcaption></figure></div>

**h)** Enter the value **High** in the field and click the **OK** button.

<div align="left"><figure><img src="https://556081438-files.gitbook.io/~/files/v0/b/gitbook-x-prod.appspot.com/o/spaces%2FmOkavtftwpMDw0OZWK5u%2Fuploads%2FM6NobXI14rKyfX9ljZB3%2Fgggg.png?alt=media&amp;token=9e4971a4-33c9-43d7-9715-0f01b87148d1" alt="" width="485"><figcaption></figcaption></figure></div>

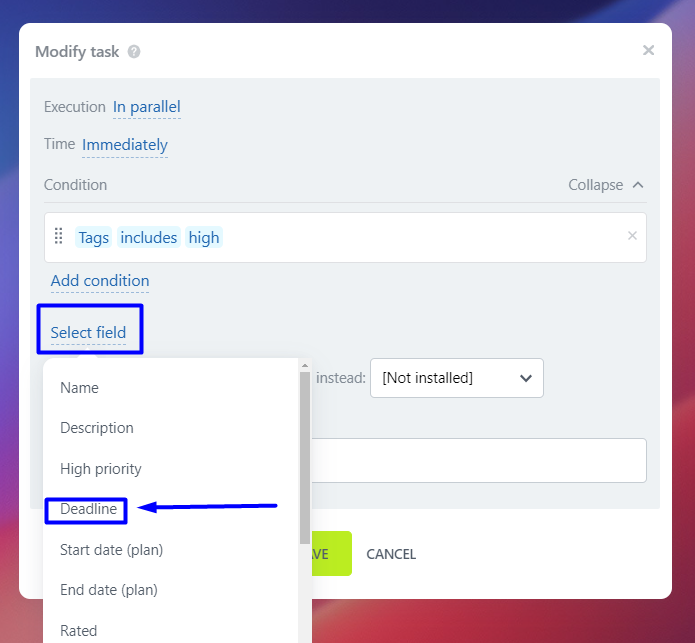
**i)** Click **Select field** and choose the **Deadline** option.<br>

<div align="left"><figure><img src="https://556081438-files.gitbook.io/~/files/v0/b/gitbook-x-prod.appspot.com/o/spaces%2FmOkavtftwpMDw0OZWK5u%2Fuploads%2FyG49C7YYadecZPRZaF7b%2Fh.png?alt=media&amp;token=520bfefd-a1b8-47c1-822e-32685f69edcb" alt="" width="521"><figcaption></figcaption></figure></div>

**j)** Select the value **1 day** and click the **OK** button.<br>

<div align="left"><figure><img src="https://556081438-files.gitbook.io/~/files/v0/b/gitbook-x-prod.appspot.com/o/spaces%2FmOkavtftwpMDw0OZWK5u%2Fuploads%2Fyuw6xjHv4S3ZGHgt4rQZ%2Fhh.png?alt=media&amp;token=35e15fda-b074-4efb-b809-2af411a6855d" alt="" width="563"><figcaption></figcaption></figure></div>

**k)**  Choose the **Change on behalf of** option in the **Administrator** column to indicate that the deadline change occurred automatically.

<div align="left"><figure><img src="https://556081438-files.gitbook.io/~/files/v0/b/gitbook-x-prod.appspot.com/o/spaces%2FmOkavtftwpMDw0OZWK5u%2Fuploads%2FPH8eo1a5W0cVUSQxzUdq%2Fhhh.png?alt=media&amp;token=556d43ec-8107-4888-9d2f-3f501073849d" alt="" width="530"><figcaption></figcaption></figure></div>

#### **2.6.4-** To setup the deadline robot for the **Medium** priority,&#x20;

repeat steps **a** to **k** from the previous section ([**2.6.3-** Robots for **Priority** section: **High tag**](#id-2.6.3-robots-for-priority-section-high-tag)**)**.&#x20;

In step **j**, instead of customizing the robot for **1 day**, customize it to **3 days**.

<div align="left"><figure><img src="https://556081438-files.gitbook.io/~/files/v0/b/gitbook-x-prod.appspot.com/o/spaces%2FmOkavtftwpMDw0OZWK5u%2Fuploads%2F25yX44yj4SY7O7lGr5Q3%2Fi.png?alt=media&amp;token=25db8745-4559-4a41-8d1c-920b41e9f1e5" alt="" width="479"><figcaption></figcaption></figure></div>

#### **2.6.5-** To setup the deadline robot for the **Low** priority,&#x20;

repeat steps **a** to **k** from the section: [**2.6.3-** Robots for **Priority** section: **High tag**](#id-2.6.3-robots-for-priority-section-high-tag).&#x20;

In step **j**, instead of customizing the robot for **1 day**, customize it to **5 days**.

<div align="left"><figure><img src="https://556081438-files.gitbook.io/~/files/v0/b/gitbook-x-prod.appspot.com/o/spaces%2FmOkavtftwpMDw0OZWK5u%2Fuploads%2FtQpa8QxC3MePZ3X2IHW9%2Fii.png?alt=media&amp;token=8cfb7a76-a4aa-49f2-ae8d-8e476bd8a045" alt="" width="484"><figcaption></figcaption></figure></div>

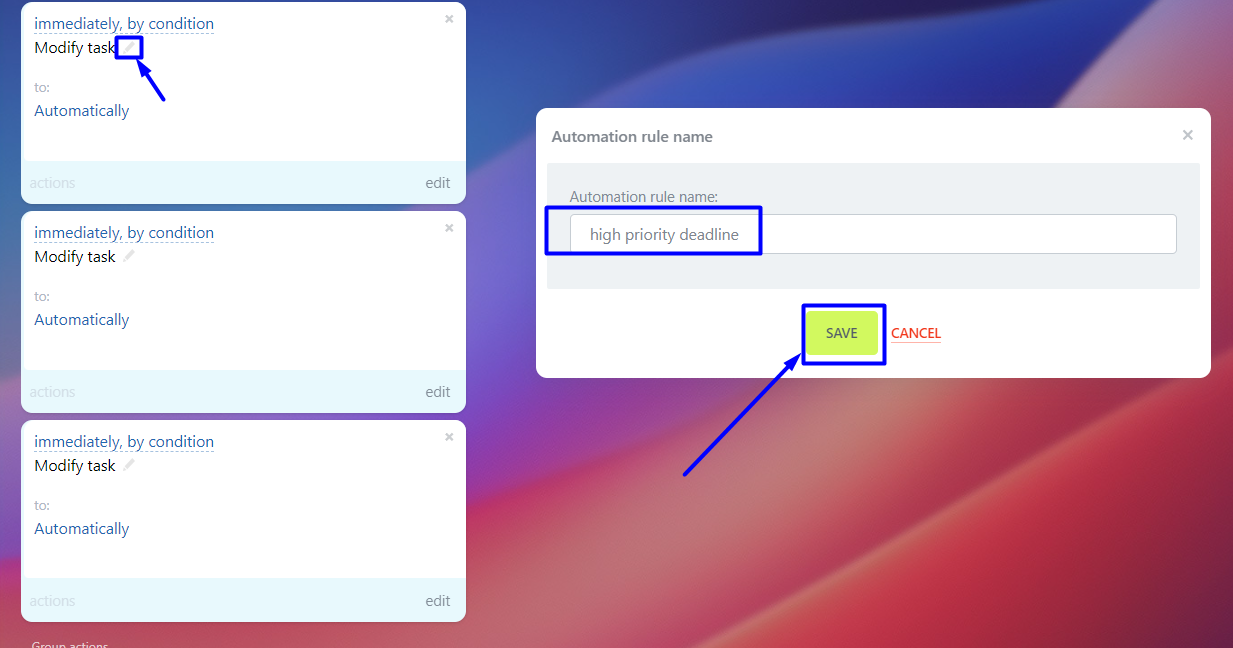
**a)** To change the name of the robot, click on the **pencil icon** and **enter the new name**.

<div align="left"><figure><img src="https://556081438-files.gitbook.io/~/files/v0/b/gitbook-x-prod.appspot.com/o/spaces%2FmOkavtftwpMDw0OZWK5u%2Fuploads%2FMSGT2DJxDwMQjzmfbquZ%2Fiii.png?alt=media&amp;token=53c70d0c-aa70-4f13-a3fe-ac4e57fbf44d" alt=""><figcaption></figcaption></figure></div>

**b)** Now that you have **setup the robot**, when a ticket is received from the client, the **deadline** for completing the ticket is automatically determined:

<div align="left"><figure><img src="https://556081438-files.gitbook.io/~/files/v0/b/gitbook-x-prod.appspot.com/o/spaces%2FmOkavtftwpMDw0OZWK5u%2Fuploads%2FYxbD7TZayKbJRY6PMOU7%2Fiiii.png?alt=media&amp;token=18cccb1a-b197-4d15-8319-e98c60c22e19" alt="" width="563"><figcaption></figcaption></figure></div>

<mark style="color:orange;">**Important note!**</mark> The deadline for completing the ticket currently varies depending on the tag selected by the client when creating the ticket.

### 2.7 NOTIFICATIONS SETTINGS

#### **2.7.1-** Setting up the **Important Task** icon.

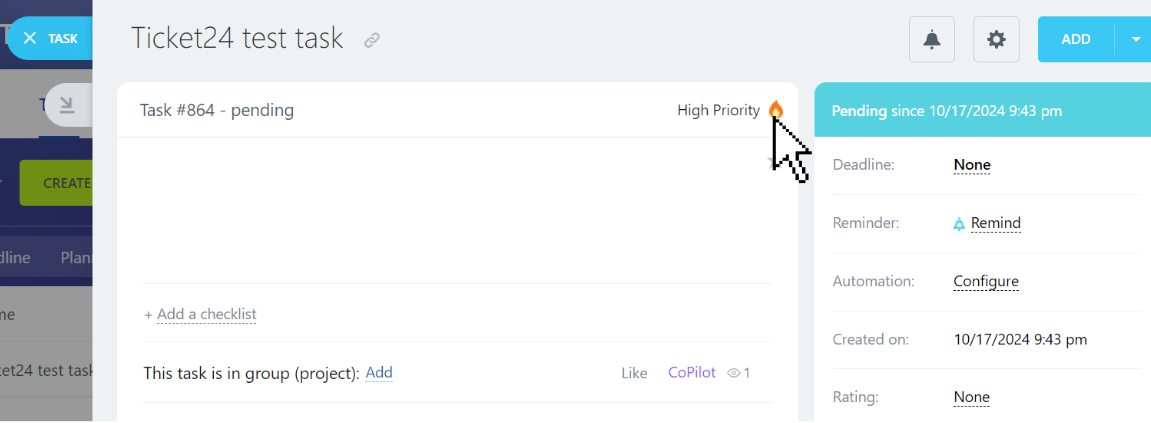
In the **task window** for the tickets, there is a built-in mechanism called **High Priority** that can be activated by clicking on the **fire icon**:

<figure><img src="https://556081438-files.gitbook.io/~/files/v0/b/gitbook-x-prod.appspot.com/o/spaces%2FmOkavtftwpMDw0OZWK5u%2Fuploads%2F0IHk91WxdBJbY6zd4cdo%2F1.PNG?alt=media&amp;token=b7b2a5d0-151d-4f3d-b461-587de73f73e3" alt=""><figcaption></figcaption></figure>

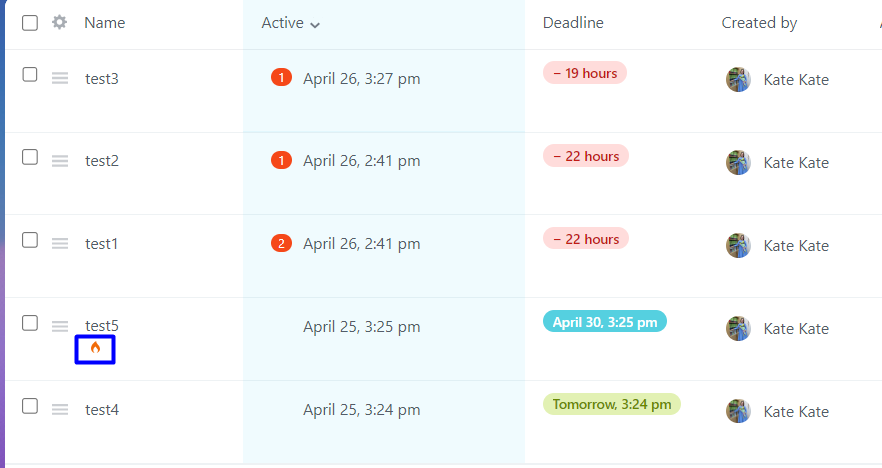
Thus, in the **task list**, this task with **high priority** will be **highlighted** using an icon:

<div align="left"><figure><img src="https://556081438-files.gitbook.io/~/files/v0/b/gitbook-x-prod.appspot.com/o/spaces%2FmOkavtftwpMDw0OZWK5u%2Fuploads%2F0IG9F08Ici2cs7gqpZv3%2F2.png?alt=media&amp;token=9815596e-71e1-4536-ab3d-54e37e6ea59a" alt="" width="563"><figcaption></figcaption></figure></div>

**a)** To configure automatic highlighting of tasks with high priority,

create a new automation and select the **New** stage, then choose the group **For employee**, and **add** the **Modify task** robot.

<div align="left"><figure><img src="https://556081438-files.gitbook.io/~/files/v0/b/gitbook-x-prod.appspot.com/o/spaces%2FmOkavtftwpMDw0OZWK5u%2Fuploads%2F5J28F6ZRi1AXLIQzXiwt%2F3.png?alt=media&amp;token=ab758a22-0cd7-4054-a872-fd023577b10c" alt="" width="563"><figcaption></figcaption></figure></div>

**b) Delete** the **name** field.

<div align="left"><figure><img src="https://556081438-files.gitbook.io/~/files/v0/b/gitbook-x-prod.appspot.com/o/spaces%2FmOkavtftwpMDw0OZWK5u%2Fuploads%2FFNf7yDtTSZA4icJnP50H%2F4.png?alt=media&amp;token=e3b78985-5cb1-4141-91d9-fd1c2137dc02" alt="" width="482"><figcaption></figcaption></figure></div>

**c)** Click the **Add condition** button in the **Condition** section and then click on an empty line with a condition, open the dropdown list with the value **ID**, search through the search bar for **Tags** option, and click on it.

<div align="left"><figure><img src="https://556081438-files.gitbook.io/~/files/v0/b/gitbook-x-prod.appspot.com/o/spaces%2FmOkavtftwpMDw0OZWK5u%2Fuploads%2FDdJZyFIelUA0tLHJC0CU%2F5.png?alt=media&amp;token=079f8789-f033-412d-9a10-27775e27a806" alt="" width="487"><figcaption></figcaption></figure></div>

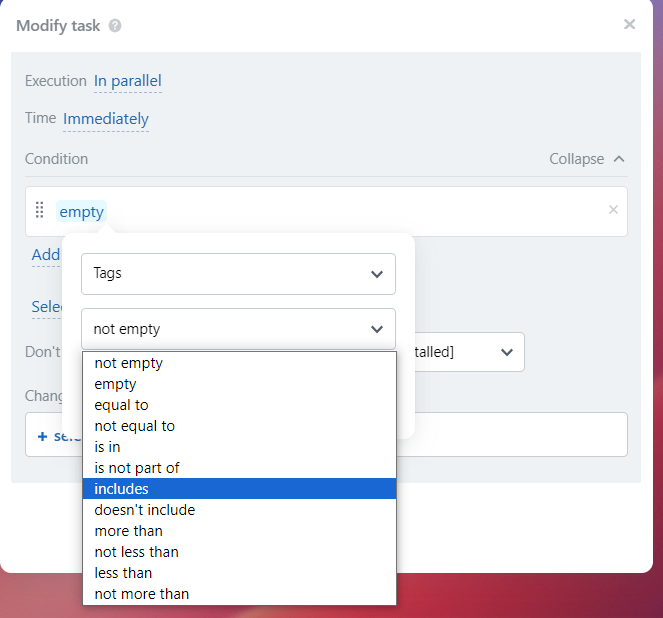
**d)** Click on the dropdown list with the N**ot empty** field and select the **Includes** option.

<div align="left"><figure><img src="https://556081438-files.gitbook.io/~/files/v0/b/gitbook-x-prod.appspot.com/o/spaces%2FmOkavtftwpMDw0OZWK5u%2Fuploads%2FhYRtMQVwMlCL4VkGWo8Y%2F6.png?alt=media&amp;token=6fba9602-9e99-4112-8bd9-a273263b80a4" alt="" width="497"><figcaption></figcaption></figure></div>

**e)** Enter the value **High** in the last field and click the **OK** button.

<div align="left"><figure><img src="https://556081438-files.gitbook.io/~/files/v0/b/gitbook-x-prod.appspot.com/o/spaces%2FmOkavtftwpMDw0OZWK5u%2Fuploads%2FCU0BqJIUU5RFwlUVDdRJ%2F7.png?alt=media&amp;token=e043f43e-b2cc-4ac4-96d3-59b0a20b4cc7" alt="" width="485"><figcaption></figcaption></figure></div>

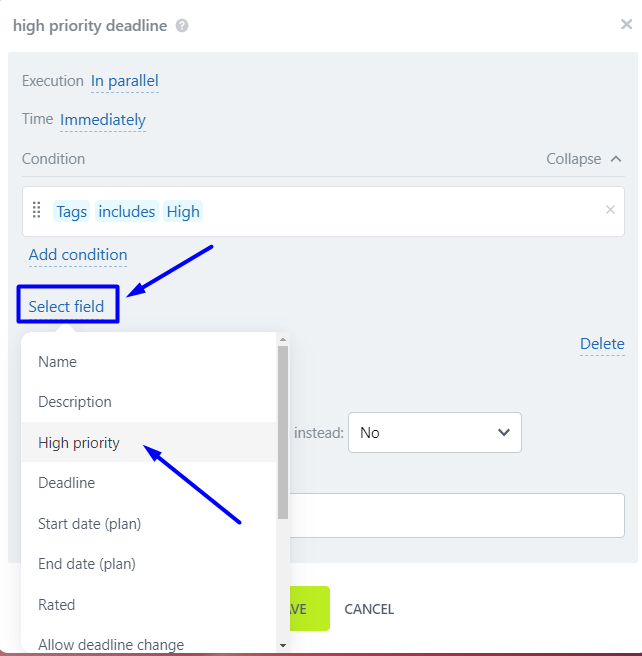
**f)** Click **Select field** and choose **High priority**.

<div align="left"><figure><img src="https://556081438-files.gitbook.io/~/files/v0/b/gitbook-x-prod.appspot.com/o/spaces%2FmOkavtftwpMDw0OZWK5u%2Fuploads%2FVlgXuAiQql3Dh9anyaRf%2F8.png?alt=media&amp;token=a3d75e26-892e-4c02-a77f-17ad0ed338ae" alt="" width="482"><figcaption></figcaption></figure></div>

**g)** Select **Yes** in the **High priority** field and click **Save**.

<div align="left"><figure><img src="https://556081438-files.gitbook.io/~/files/v0/b/gitbook-x-prod.appspot.com/o/spaces%2FmOkavtftwpMDw0OZWK5u%2Fuploads%2FjWP8BXvnOlwEdFXUhVdP%2F9.png?alt=media&amp;token=32895283-b37f-49c9-a69e-7d420e6ceb67" alt="" width="482"><figcaption></figcaption></figure></div>

**h)** Now you can test the robot you have just created:

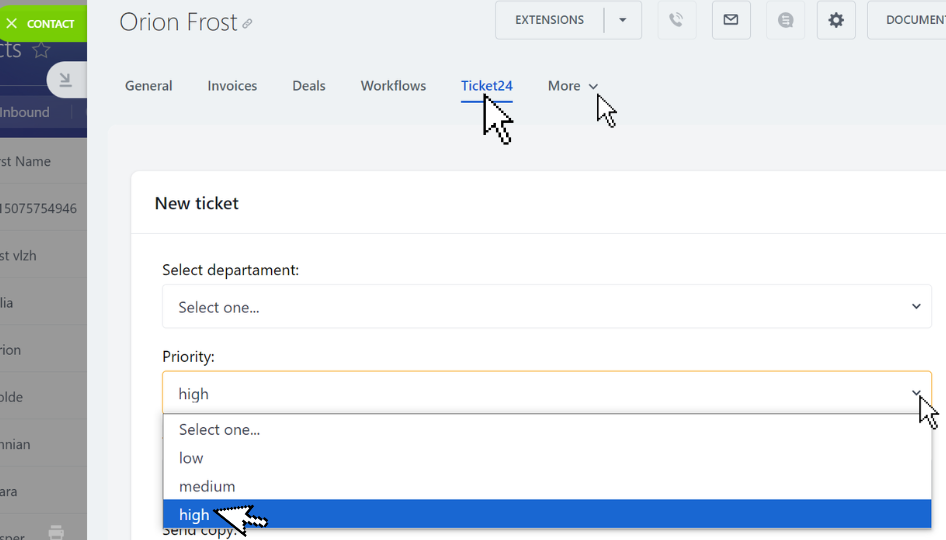
open a **contact card** (CRM -> Customers -> Contacts), open the **Ticket24** tab (if you don't see it on the top menu bar, click on **More** and select it from the dropdown menu) and fill out the required fields for the **ticket**.&#x20;

Make sure to set it as **High priority**.

<div align="left"><figure><img src="https://556081438-files.gitbook.io/~/files/v0/b/gitbook-x-prod.appspot.com/o/spaces%2FmOkavtftwpMDw0OZWK5u%2Fuploads%2FMxbhtENke5KKZorS7QYf%2F10.PNG?alt=media&amp;token=f822a08f-c4d5-4c93-aa00-8089d4272076" alt="" width="563"><figcaption></figcaption></figure></div>

**i)** Once you create the ticket, you will see it appears with the **High priority** icon in the **Workgroup tasks**:

<div align="left"><figure><img src="https://556081438-files.gitbook.io/~/files/v0/b/gitbook-x-prod.appspot.com/o/spaces%2FmOkavtftwpMDw0OZWK5u%2Fuploads%2FLj8A1AS3bE86vTsdAmzW%2F11.png?alt=media&amp;token=03ea5081-0f99-48bf-a512-21635836ab69" alt="" width="563"><figcaption></figcaption></figure></div>

#### **2.7.2- Push notification** settings in the **workgroup**.

**a)** To set up **push** **notifications** for the **manager** when creating a new ticket,

create a new robot, choose the stage **New** and the **For employee** group, choose the **Add notification** robot.

<div align="left"><figure><img src="https://556081438-files.gitbook.io/~/files/v0/b/gitbook-x-prod.appspot.com/o/spaces%2FmOkavtftwpMDw0OZWK5u%2Fuploads%2FNIsGsO2waD2qPSFatKFZ%2F12.png?alt=media&amp;token=7bee9a53-f38e-4646-99ca-5512e8167373" alt="" width="563"><figcaption></figcaption></figure></div>

**b)** Enter the **notification text** and choose the **message sender**.

<div align="left"><figure><img src="https://556081438-files.gitbook.io/~/files/v0/b/gitbook-x-prod.appspot.com/o/spaces%2FmOkavtftwpMDw0OZWK5u%2Fuploads%2FFOIkZBjoubkWOCbdd60V%2F13.png?alt=media&amp;token=08e94969-631e-4e11-a2c5-9060723adde0" alt="" width="486"><figcaption></figcaption></figure></div>

**c)** In the **Execution** section,&#x20;

change the value to **Wait** (so the robot performs the action after the previous robot has completed it's action) and click the **Save** button.

<div align="left"><figure><img src="https://556081438-files.gitbook.io/~/files/v0/b/gitbook-x-prod.appspot.com/o/spaces%2FmOkavtftwpMDw0OZWK5u%2Fuploads%2FqTIKZnMwavIkjZfph3F2%2F14.png?alt=media&amp;token=0e0211b9-31bf-4bb6-ac1c-f42069f4c71e" alt="" width="563"><figcaption></figcaption></figure></div>

Now the **manager** will **receive a notification** about the **new ticket**:

<div align="left"><figure><img src="https://556081438-files.gitbook.io/~/files/v0/b/gitbook-x-prod.appspot.com/o/spaces%2FmOkavtftwpMDw0OZWK5u%2Fuploads%2FkaVws779PoMCP4mzBECr%2F15.png?alt=media&amp;token=cf7c2380-66a8-4bf2-8354-dd392948f644" alt="" width="410"><figcaption></figcaption></figure></div>

#### **2.7.3- Email notification** settings in the **workgroup**.

To set up **notifications** for the manager **via email** when creating a new ticket,

**a)** create a new robot, choose the **New** stage, then choose the **For employee** group and choose the **Send email** robot.

<div align="left"><figure><img src="https://556081438-files.gitbook.io/~/files/v0/b/gitbook-x-prod.appspot.com/o/spaces%2FmOkavtftwpMDw0OZWK5u%2Fuploads%2F9IwukxGVmu8ub17R4IK3%2F16.png?alt=media&amp;token=f4a805cf-b006-4fb5-80cf-4f07024a3600" alt="" width="563"><figcaption></figcaption></figure></div>

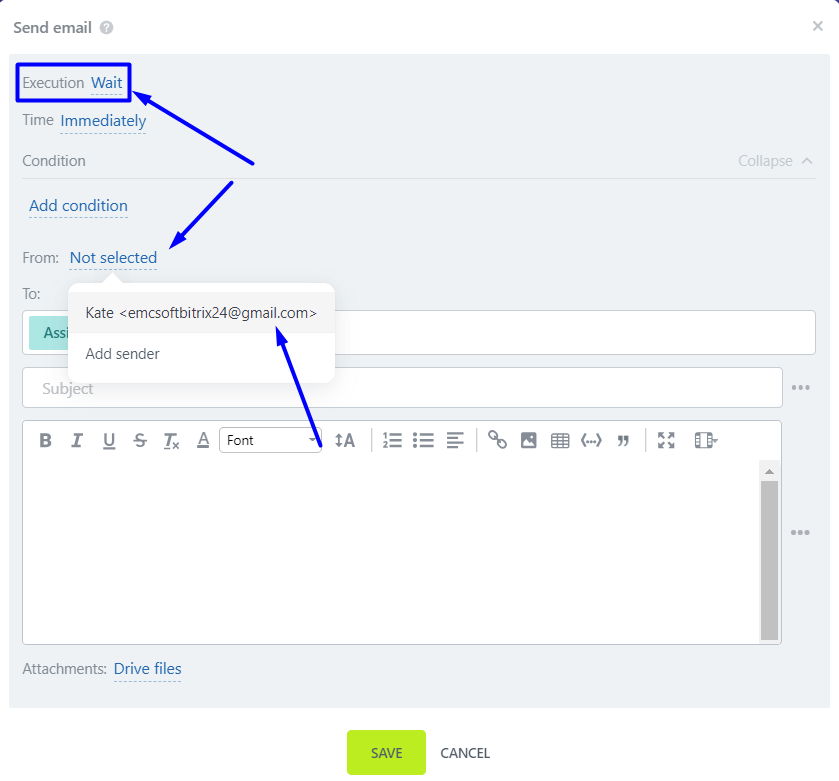
**b)** In the **Execution** section,&#x20;

change the value to **Wait** (so the robot performs the action after the previous robot has completed its action) and choose the **message sender**.

<div align="left"><figure><img src="https://556081438-files.gitbook.io/~/files/v0/b/gitbook-x-prod.appspot.com/o/spaces%2FmOkavtftwpMDw0OZWK5u%2Fuploads%2FPK5SYAE3xDlIXdD7VMai%2F17.png?alt=media&amp;token=360a0867-3d68-4077-a6da-ee8a86c96b3c" alt="" width="563"><figcaption></figcaption></figure></div>

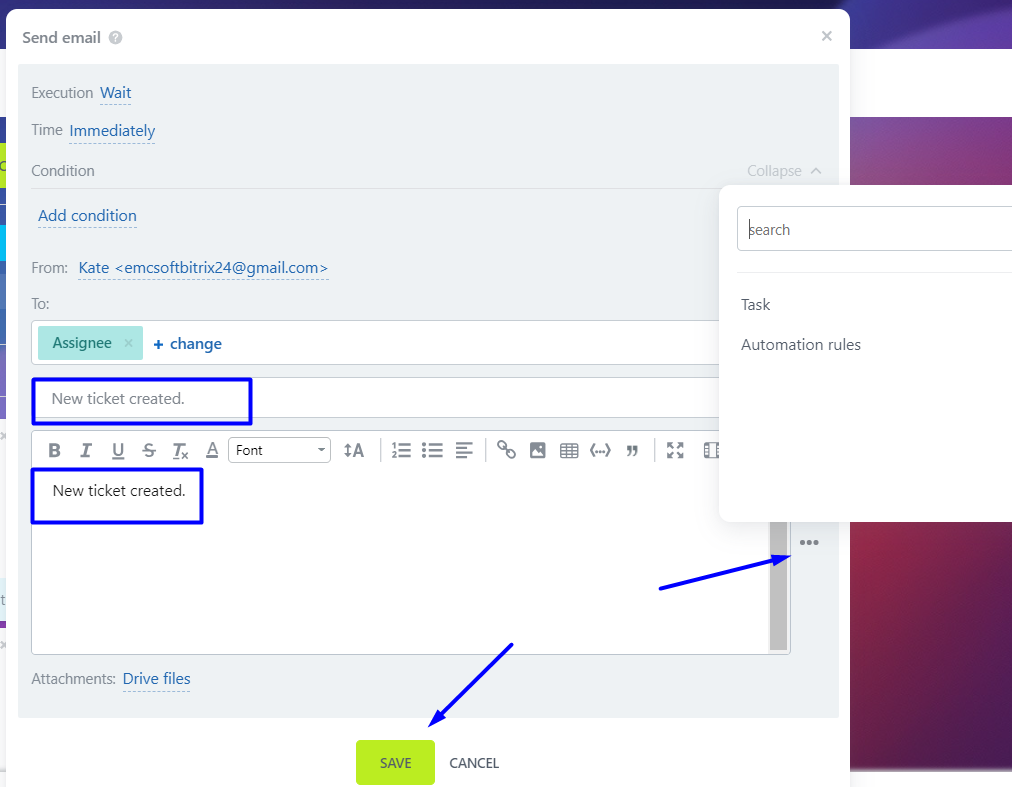
**c)** Enter the **subject** and **message** text (you can use variables in the message text) and click the **Save** button.

<div align="left"><figure><img src="https://556081438-files.gitbook.io/~/files/v0/b/gitbook-x-prod.appspot.com/o/spaces%2FmOkavtftwpMDw0OZWK5u%2Fuploads%2FbB3CDMbrEdLPE6qZA2UQ%2F18.png?alt=media&amp;token=8d56576f-4ea5-404f-bbad-fdcd25f16dd5" alt="" width="563"><figcaption></figcaption></figure></div>

Now when a **new ticket** is created, the **responsible employee** receives a **notification** via **email:**

<div align="left"><figure><img src="https://556081438-files.gitbook.io/~/files/v0/b/gitbook-x-prod.appspot.com/o/spaces%2FmOkavtftwpMDw0OZWK5u%2Fuploads%2FZN7EOLc2ZI2SWqFiW9tK%2F19.png?alt=media&amp;token=9fcf7441-7976-4842-8620-bd89efa0c320" alt="" width="342"><figcaption></figcaption></figure></div>

For the **responsible employee** to **receive** this **email**, they should upload their email address to their profile:

<div align="left"><figure><img src="https://556081438-files.gitbook.io/~/files/v0/b/gitbook-x-prod.appspot.com/o/spaces%2FmOkavtftwpMDw0OZWK5u%2Fuploads%2F6Zhux67CfLkadsK1SEO9%2F20.png?alt=media&amp;token=0b1e45ce-9803-4879-8994-1d3737162b1c" alt="" width="534"><figcaption></figcaption></figure></div>

### 2.8 CHANGE OF TASK STATUS CONFIGURATION

To set up **automatic status changes** for the ticket **tasks** upon completion,

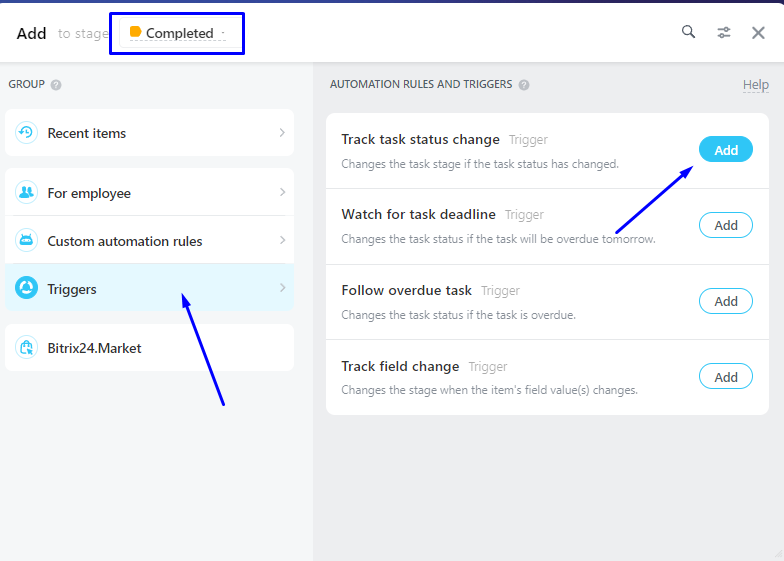
**a)** create a new robot, choose the **Completed** stage, choose the **Triggers** group and select the **Track task status change**.

<div align="left"><figure><img src="https://556081438-files.gitbook.io/~/files/v0/b/gitbook-x-prod.appspot.com/o/spaces%2FmOkavtftwpMDw0OZWK5u%2Fuploads%2Fw0XScwkZ5kiCtKZ96PGa%2F21.png?alt=media&amp;token=64b9f8a6-1103-4660-9364-cd334e5bbdd1" alt="" width="563"><figcaption></figcaption></figure></div>

**b)** Select the **Completed** task status and click **save**.

<div align="left"><figure><img src="https://556081438-files.gitbook.io/~/files/v0/b/gitbook-x-prod.appspot.com/o/spaces%2FmOkavtftwpMDw0OZWK5u%2Fuploads%2Fxkfp0n1KDDba6FHmCw8E%2F22.png?alt=media&amp;token=cba12ea7-6ef5-4973-9fca-a598c6a92425" alt=""><figcaption></figcaption></figure></div>

**c)** Create a robot to change the task status, select the **New** stage, choose the **For employee** group and choose the **Change stage** robot.

<div align="left"><figure><img src="https://556081438-files.gitbook.io/~/files/v0/b/gitbook-x-prod.appspot.com/o/spaces%2FmOkavtftwpMDw0OZWK5u%2Fuploads%2FCxpgCIVReF6KNEnvFN4h%2F23.png?alt=media&amp;token=f6adeb31-061b-4b8f-bc47-0614242819ed" alt="" width="563"><figcaption></figcaption></figure></div>

**d)** Enter the following **condition**: Status, equals to, Completed and select the **Completed stage**.

<div align="left"><figure><img src="https://556081438-files.gitbook.io/~/files/v0/b/gitbook-x-prod.appspot.com/o/spaces%2FmOkavtftwpMDw0OZWK5u%2Fuploads%2FvhLqHXTJBn7QHmb3PBBO%2F24.png?alt=media&amp;token=809d1278-12cc-43e1-92d9-78b580a94e48" alt=""><figcaption></figcaption></figure></div>

Now when a ticket task is **completed**:

<div align="left"><figure><img src="https://556081438-files.gitbook.io/~/files/v0/b/gitbook-x-prod.appspot.com/o/spaces%2FmOkavtftwpMDw0OZWK5u%2Fuploads%2FLQM21cYFbhBmAGa4KvNj%2F25.png?alt=media&amp;token=4f0bab78-4be3-42e9-8d3f-ce84e7e4c6bb" alt="" width="563"><figcaption></figcaption></figure></div>

it will automatically move from the **New stage** to the **Completed stage**:

<div align="left"><figure><img src="https://556081438-files.gitbook.io/~/files/v0/b/gitbook-x-prod.appspot.com/o/spaces%2FmOkavtftwpMDw0OZWK5u%2Fuploads%2FspMhdnmZMaWxeOx8Aypb%2F26.png?alt=media&amp;token=cd7860e2-ba6e-42b1-9221-761a38ae24b0" alt=""><figcaption></figcaption></figure></div>

**e)** To create a robot for transitioning from the stages **In progress** and **Checking** to the **Completed** stage,

click on the **Actions** tab, then click the **Copy** **button** on the **robot created previously** for the **New** **stage** and **repeat** this action **twice**.

<div align="left"><figure><img src="https://556081438-files.gitbook.io/~/files/v0/b/gitbook-x-prod.appspot.com/o/spaces%2FmOkavtftwpMDw0OZWK5u%2Fuploads%2FL4hBBpcqqhCFs6AchTtd%2Fimage.png?alt=media&amp;token=210302a2-2b80-4346-9aab-922f6c35ee31" alt="" width="410"><figcaption></figcaption></figure></div>

**f)** Transfer the created robots to the stages **In progress** and **Checking**.

<div align="left"><figure><img src="https://556081438-files.gitbook.io/~/files/v0/b/gitbook-x-prod.appspot.com/o/spaces%2FmOkavtftwpMDw0OZWK5u%2Fuploads%2FSoI92LjtfveC4Ijgdmxl%2F27.png?alt=media&amp;token=17104d80-8b27-40fe-8c36-3657f2f3fc33" alt="" width="563"><figcaption></figcaption></figure></div>

**g)** Test the execution of the task robots: **test4** and **test7** (which are the robots you copied in the previous step) by **opening the tasks** and hitting the **finished** button.

<div align="left"><figure><img src="https://556081438-files.gitbook.io/~/files/v0/b/gitbook-x-prod.appspot.com/o/spaces%2FmOkavtftwpMDw0OZWK5u%2Fuploads%2FS31qX8Cle5UouP7WDLvq%2F28.png?alt=media&amp;token=d168ef72-9444-4cd1-8549-93476e3ca45e" alt="" width="542"><figcaption></figcaption></figure></div>

When the tasks are completed, they should move to the **Completed** **stage:**

<div align="left"><figure><img src="https://556081438-files.gitbook.io/~/files/v0/b/gitbook-x-prod.appspot.com/o/spaces%2FmOkavtftwpMDw0OZWK5u%2Fuploads%2FuRATZFIzsSP2uDdfngm4%2Fimage.png?alt=media&amp;token=92b4685f-0aea-4b8f-8053-861bcbcbd6fd" alt="" width="563"><figcaption></figcaption></figure></div>

In the client's view of the **ticketing account**, completed tasks will be displayed with the **Completed** status:

<div align="left"><figure><img src="https://556081438-files.gitbook.io/~/files/v0/b/gitbook-x-prod.appspot.com/o/spaces%2FmOkavtftwpMDw0OZWK5u%2Fuploads%2Fx7k3yzSZ1dqokxgWSYCC%2Fimage.png?alt=media&amp;token=6c25fe4a-3457-4a39-9d54-84dd2dc4302e" alt="" width="563"><figcaption></figcaption></figure></div>

**h)** To display tasks with the **Completed status** in the workgroup,&#x20;

select the **Completed** **status** in the **filter**.

<figure><img src="https://556081438-files.gitbook.io/~/files/v0/b/gitbook-x-prod.appspot.com/o/spaces%2FmOkavtftwpMDw0OZWK5u%2Fuploads%2Fx8eKz1rnnBdb0RIQ9bVL%2Fimage.png?alt=media&amp;token=a0c9554b-3b10-4f06-846b-bd546058354a" alt=""><figcaption></figcaption></figure>

## <mark style="color:red;">III CLIENT PORTAL VIEW AND TICKET DISPLAY</mark>&#x20;

### 3.1 CREATING A TICKET&#x20;

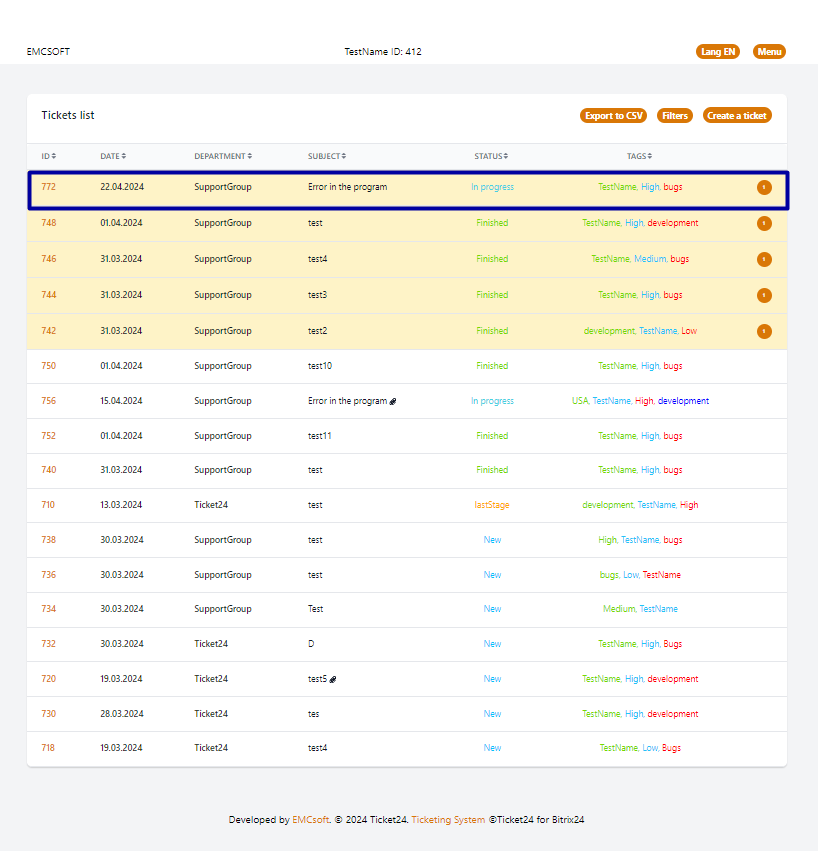
When the client logs in to their ticketing portal, they will see a list of their requests.&#x20;

Employees or managers can also log in as the client to view the client's portal display and raise tickets (see section [**2.2.3**](#id-2.2.3-to-give-client-access-to-their-ticket24-portal-copy-the-password-from-their-contact-card-and-s) in: [**2.2  USERNAME AND PASSWORD FOR CLIENTS**](#id-2.2-username-and-password-for-clients) above).

This is what the client's portal will look like:

<figure><img src="https://556081438-files.gitbook.io/~/files/v0/b/gitbook-x-prod.appspot.com/o/spaces%2FmOkavtftwpMDw0OZWK5u%2Fuploads%2F6TfIYPqi4nWt1AO00bPj%2Fimage.png?alt=media&amp;token=9c45dcec-0070-43a3-a59c-b25ab6c44524" alt=""><figcaption></figcaption></figure>

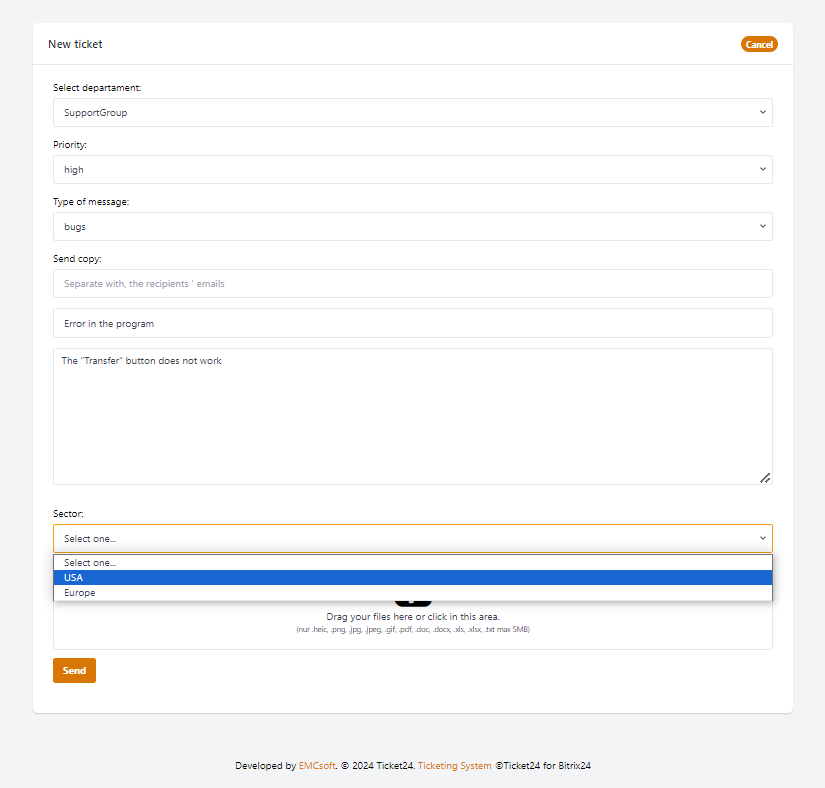
To raise a **ticket**,

**a)** click the **Create a ticket** button.

<figure><img src="https://556081438-files.gitbook.io/~/files/v0/b/gitbook-x-prod.appspot.com/o/spaces%2FmOkavtftwpMDw0OZWK5u%2Fuploads%2FEOrJOlHw7w8W310H4OM2%2Fimage.png?alt=media&amp;token=0218417b-7172-44e4-affb-6cbe2df52c4f" alt=""><figcaption></figcaption></figure>

**b)** Select the **department** to which the ticket will be submitted.

<figure><img src="https://556081438-files.gitbook.io/~/files/v0/b/gitbook-x-prod.appspot.com/o/spaces%2FmOkavtftwpMDw0OZWK5u%2Fuploads%2FMojexZIA7FMHwfbGuKrD%2Fimage.png?alt=media&amp;token=9211b3ac-b9a3-47cb-8d50-091bbf7c19d1" alt=""><figcaption></figcaption></figure>

**c)** Select the ticket **priority**.

Remember, using tags such as **high**, **low** and **medium,** different **deadlines** for completing the ticket are assigned.

<figure><img src="https://556081438-files.gitbook.io/~/files/v0/b/gitbook-x-prod.appspot.com/o/spaces%2FmOkavtftwpMDw0OZWK5u%2Fuploads%2FPNHmnXOIbL320rs77l3H%2Fimage.png?alt=media&amp;token=72c14b49-e833-42bb-be38-709a62232c1d" alt=""><figcaption></figcaption></figure>

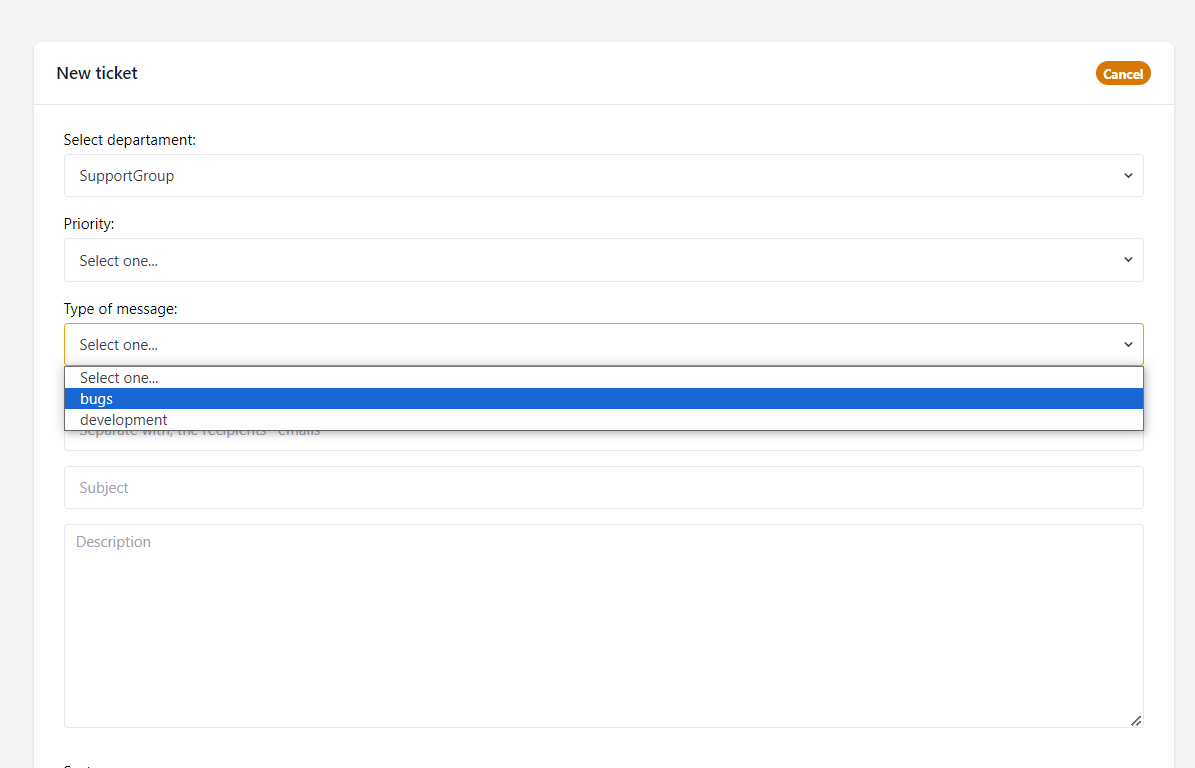
**d)** Choose the **message type**.

Remember, using tags such as **bugs** and **development**, the responsible person who will handle the ticket's work is determined.

<figure><img src="https://556081438-files.gitbook.io/~/files/v0/b/gitbook-x-prod.appspot.com/o/spaces%2FmOkavtftwpMDw0OZWK5u%2Fuploads%2FKR7elVGeD0dsVR8sjT8N%2Fimage.png?alt=media&amp;token=07b07f99-aa8f-4298-ab0a-9d456241dc8b" alt=""><figcaption></figcaption></figure>

**e)** To send a copy of the **email notification** for the **creation of the ticket** to other users besides the client, type the other recipients' emails and separate them with commas:

<figure><img src="https://556081438-files.gitbook.io/~/files/v0/b/gitbook-x-prod.appspot.com/o/spaces%2FmOkavtftwpMDw0OZWK5u%2Fuploads%2FxYCOu0sr9st5AdlaESHO%2Fimage.png?alt=media&amp;token=01fd05d7-352b-478b-9b90-4ff492a81684" alt=""><figcaption></figcaption></figure>

**f)** Enter a **Subject** and **Text** for of the ticket.

<figure><img src="https://556081438-files.gitbook.io/~/files/v0/b/gitbook-x-prod.appspot.com/o/spaces%2FmOkavtftwpMDw0OZWK5u%2Fuploads%2FGCxDCkkwOPhNZufFZNnO%2Fimage.png?alt=media&amp;token=de1fd0b8-d011-4f7a-aee6-b65a0739cf01" alt=""><figcaption></figcaption></figure>

**g)** Select the client's corresponding **country**.

Remember, using the **USA** and **Europe** tags, the client's **region** of residence is determined.

<figure><img src="https://556081438-files.gitbook.io/~/files/v0/b/gitbook-x-prod.appspot.com/o/spaces%2FmOkavtftwpMDw0OZWK5u%2Fuploads%2FFnFODbZyYfX1EEriS5TX%2Fimage.png?alt=media&amp;token=7a7e9fb5-4854-41ab-91fe-3e4e148919e9" alt=""><figcaption></figcaption></figure>

**h)** If necessary, **files** explaining the issue can be **attached** to the ticket.

After entering all the data into the ticket, click the **Send** button.

<figure><img src="https://556081438-files.gitbook.io/~/files/v0/b/gitbook-x-prod.appspot.com/o/spaces%2FmOkavtftwpMDw0OZWK5u%2Fuploads%2FeVMkEW5Nz55juRU1PQSo%2Fimage.png?alt=media&amp;token=6b98616a-5bd4-4cbe-946b-04bde72434d4" alt=""><figcaption></figcaption></figure>

### **3.2 CLIENT'S DISPLAY AFTER CREATING A TICKET**

After sending, the ticket should appear in the list of tickets.

At the moment, the ticket is in the **New status**:

<figure><img src="https://556081438-files.gitbook.io/~/files/v0/b/gitbook-x-prod.appspot.com/o/spaces%2FmOkavtftwpMDw0OZWK5u%2Fuploads%2FRULRfzhYGCwosc1myc0Z%2Fimage.png?alt=media&amp;token=198a5a82-d3c1-4536-b0be-b8d1c456ca3d" alt=""><figcaption></figcaption></figure>

The ticket status will change to the **In Progress stage** as soon as the manager starts working on it:

<figure><img src="https://556081438-files.gitbook.io/~/files/v0/b/gitbook-x-prod.appspot.com/o/spaces%2FmOkavtftwpMDw0OZWK5u%2Fuploads%2FAKYTdQD8yJLzOeewf0VF%2Fimage.png?alt=media&amp;token=fe6604a9-2001-4320-8729-54a00ac54061" alt=""><figcaption></figcaption></figure>

**a)** Click on the **ID number** to open the ticket.&#x20;

Inside the ticket, the client will see **who is responsible** for handing it:

<div align="left"><figure><img src="https://556081438-files.gitbook.io/~/files/v0/b/gitbook-x-prod.appspot.com/o/spaces%2FmOkavtftwpMDw0OZWK5u%2Fuploads%2FsyaZPDAibVfpF9muJ9Xf%2Fimage.png?alt=media&amp;token=efea4123-d465-40b6-a0b9-d1f8b80dd2be" alt="" width="563"><figcaption></figcaption></figure></div>

### 3.3 CLIENT - COMPANY MEMBER COMMUNICATION

You and the client can communicate through the **Ticket24** portal and the **Bitrix24 Workgroup tasks.**

**a)** To communicate with the client,&#x20;

open the **Ticket task** in the **Workgroup** you assigned for the **Ticket tasks,** write the **message** you want the customer to see, and click **send**.&#x20;

<figure><img src="https://556081438-files.gitbook.io/~/files/v0/b/gitbook-x-prod.appspot.com/o/spaces%2FmOkavtftwpMDw0OZWK5u%2Fuploads%2FHjl1aKYtrUn76AFTUY5b%2Fimage.png?alt=media&amp;token=dfbb0d1b-5e1a-4aca-ad21-0106a0b4f655" alt=""><figcaption></figcaption></figure>

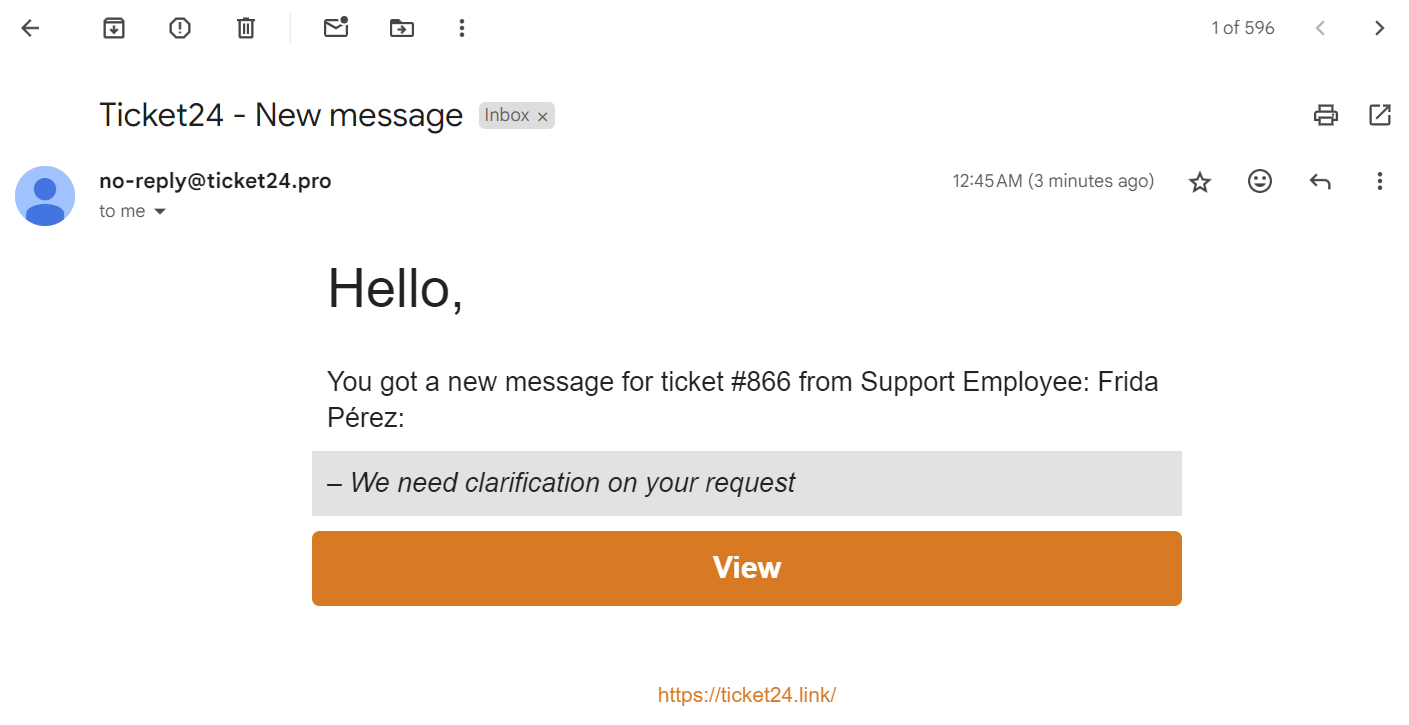
The client will receive an **email notification** of the message:

<div align="left"><figure><img src="https://556081438-files.gitbook.io/~/files/v0/b/gitbook-x-prod.appspot.com/o/spaces%2FmOkavtftwpMDw0OZWK5u%2Fuploads%2FfZcURllSbOdd9985emUi%2Fimage.png?alt=media&amp;token=bcc39886-9d13-4adb-a2d7-400c7a34b5a2" alt="" width="563"><figcaption></figcaption></figure></div>

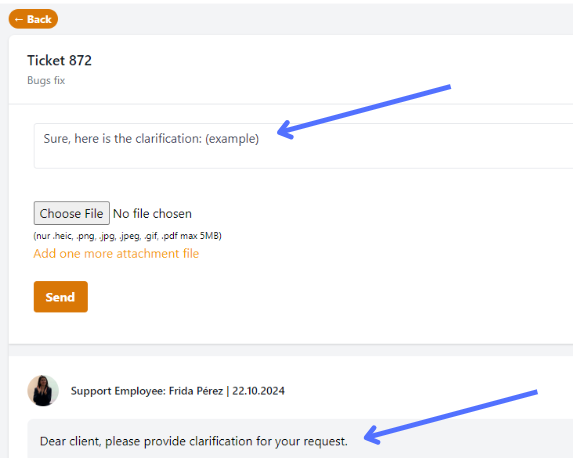
The client can respond through their **Ticket24** portal.

To do this, the client must **open** the ticket by clicking on its **ID number**:

<figure><img src="https://556081438-files.gitbook.io/~/files/v0/b/gitbook-x-prod.appspot.com/o/spaces%2FmOkavtftwpMDw0OZWK5u%2Fuploads%2F5A13AJieOZjs8CdASdVw%2Fimage.png?alt=media&amp;token=1e4773e3-4590-48c3-929e-3d7da417c102" alt=""><figcaption></figcaption></figure>

Once the ticket is **open**, the client will see the **employee's message** and **reply**:

<div align="left"><figure><img src="https://556081438-files.gitbook.io/~/files/v0/b/gitbook-x-prod.appspot.com/o/spaces%2FmOkavtftwpMDw0OZWK5u%2Fuploads%2FHtcrDwWkwsiBD7m3lG7u%2Fimage.png?alt=media&amp;token=639927b4-775f-40d5-9889-51d1962dc531" alt=""><figcaption></figcaption></figure></div>

The client's **reply** will be visible in the **comment section** of the **ticket task**:

<div align="left"><figure><img src="https://556081438-files.gitbook.io/~/files/v0/b/gitbook-x-prod.appspot.com/o/spaces%2FmOkavtftwpMDw0OZWK5u%2Fuploads%2FsaQzNl59QhmSmeFlMjMW%2Fimage.png?alt=media&amp;token=83672755-05c1-4e68-a57e-08d730ba348b" alt="" width="563"><figcaption></figcaption></figure></div>

When the ticket has been **closed**, the client will see their ticket has changed to the **Finished status**:

<figure><img src="https://556081438-files.gitbook.io/~/files/v0/b/gitbook-x-prod.appspot.com/o/spaces%2FmOkavtftwpMDw0OZWK5u%2Fuploads%2FA2Be3aADBepsQ5Nmhc2X%2Fimage.png?alt=media&amp;token=b04f17d1-e6e0-42a4-9401-601ed84dc77d" alt=""><figcaption></figcaption></figure>

When the ticket is closed, it disappears from the client's personal account.&#x20;

The ticket can be viewed by enabling the **Show closed task** feature in the **filters**:

<div align="left"><figure><img src="https://556081438-files.gitbook.io/~/files/v0/b/gitbook-x-prod.appspot.com/o/spaces%2FmOkavtftwpMDw0OZWK5u%2Fuploads%2FhgiID6BdSxogftnA9KZb%2Fimage.png?alt=media&amp;token=7f213ecc-057e-4b2b-bb62-269a8af781b5" alt="" width="349"><figcaption></figcaption></figure></div>

<mark style="color:orange;">**CONGRATULATIONS!**</mark> You're now a knowledgeable <mark style="color:orange;">**Ticket24**</mark> <mark style="color:orange;">**user**</mark><mark style="color:orange;">!</mark>